2013-04-03
Abstract
The Pushdo botnet has been active in the wild since January 2007, with three main generations seen to date. Neo Tan and colleagues take an in-depth look at three different variants of a new, more advanced version of Pushdo’s second generation.
Copyright © 2013 Virus Bulletin
Pushdo is a persistent botnet, having been active in the wild since January 2007. To date, there have been three main generations. The first generation of Pushdo used a clear text (with many different parameters) HTTP request to communicate with its C&C servers. This was encrypted (using RC4) in the second generation. The second generation of Pushdo also generated lots of fake SSL traffic to legitimate websites, trying to hide its communication data amongst it. The third generation of Pushdo changed dramatically: a binary data structure was introduced, along with many custom encryption algorithms to secure the communication with C&C servers. In this article, we will mainly focus on three different variants of a new, more advanced version of Pushdo’s second generation.
When the Pushdo bot is running on a compromised machine, it will first create the following registry entries and randomly generate 0x10 bytes as key data in binary format:
HKCU\Software\Microsoft\Windows\CurrentVersion“AppManagement” = [0x10 random bytes]
HKCU\SOFTWARE\MICROSOFT\WINDOWS\CURRENTVERSION“XOZNACAXMEJAZAP” = [0X10 RANDOM BYTES]
‘Xoznacaxmeja’ and ‘zap’ are both hard coded strings.The ‘xoznacaxmeja’ string will be used as this instance’s mutex name and new file name. After creating the infected flag registry entries, it will copy itself to %userprofile%\xoznacaxmeja.exe and then create the following autorun registry entry:
HKCU\Software\Microsoft\Windows\CurrentVersion\Run “xoznacaxmeja” = “[%userprofile%\xoznacaxmeja.exe]”
Then, it will load additional modules and try to communicate with its C&C servers.
The bot starts to decrypt data in a specific location of the binary into a binary template of the clicker module without the domain names, and decrypts another location of the binary into a list of domains; in both cases the data is decrypted using XORs with changing modifiers. The decrypted domains will be copied to the clicker’s binary template at a specific location; in this case, it is marked using the string ‘XNG7’. This tag is later used by a function in Pushdo and the clicker module to update the domain list. After the binary template has been filled with the domain names, it is loaded into memory and executed as a child thread of the bot.
The bot decrypts the data – which contains not only the C&C server domain names, but also the names of many other legitimate domains. Obviously, the author is trying to hide the C&C server domain amongst the many other legitimate domain names to make it hard to pick out during static analysis. It also tries to hide its communication data amongst other legitimate website traffic when undergoing dynamic analysis.
Next, it randomly chooses one domain from the list, appends ‘https://’ to create an Internet connection and sends an ‘Accept: */*’ request to it. If there is no response, or if the response size is less than 0x400 bytes, it will pick another domain randomly from the list and try that one, or else it will try to parse the response. It looks for a fake HTML tag pattern that is base64 encoded in the Pushdo binary: ‘PGltZyBzcmM9ImRhdGE6aW1hZ2UvanBlZztiYXNlNjQs’. After base64 decoding, it becomes the following:
<imgsrc=”data:image/jpeg;base64,
If it finds a match for this pattern in the response data, it will decrypt the data that comes after the comma and then inject it into a newly created svchost.exe process. This is probably one way of providing a PPI (Pay Per Install) service, since we didn’t see its own module or update binary going through this. But, in certain conditions, there is a possibility for it to get a binary update or new module in this way. However, we believe that this routine belongs to the older version of Pushdo, where it was used as the main communication protocol. In the next part, we’ll dissect the communication protocol and encryption algorithm for the three more recent variants of the Pushdo bot.
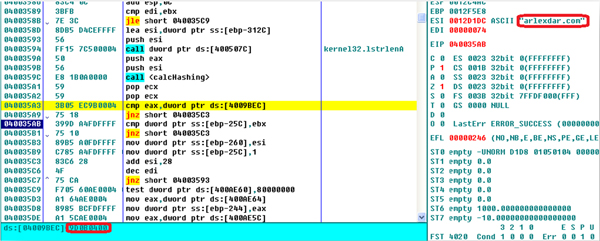
Previously in Pushdo’s second generation, before the final contact with the server there was a routine involving another list of domains hiding another C&C server among them. However, this has gone from the latest version (found in December 2012). This time, contact with the server is persistent, as the bot wants to keep exchanging information with or downloading updates from it. The C&C server is once again hidden in a second decrypted domain list. The bot calculates each domain’s hash and compares them to a pre-stored hashing value: 9D0B0400h (Figure 1). The one that matches is the C&C server.
(Click here to view a larger version of Figure 1.)
After gathering information from the victim’s PC, the bot prepares a message for sending. The structure of the plaintext message evolved between October and December 2012. There are three different data structures.
struct _PlainTextMessageV1andV2 {
   DWORD        staticDword1;   //static 01
   DWORD        staticDword2;   //may change in variants
   DWORD        staticDword3;   //static 01
   DWORD        staticDword4;   //static 00
   DWORD        staticDword5;   //static 00
   DWORD        staticDword6;   //may change in variants
   BYTE[0x10]   randGenData;   //random generated data
   BYTE[0x10]   localGenData;   //generated data using volume info and adapter info
   DWORD        installFlags;   //bit flags
   SendBlockV1  dataBlock;
}
Struct _SendBlockV1 {
   DWORD        size;
   BYTE         domainHash[size];
}
The first variant contains some static data with the hash value of the C&C domain at the end. The size of the dataBlock is always 4 because the calculated hash value of the C&C domain is a DWORD. The second variant contains a little more information than the first in the data block – the bot’s binary hash value and the server domain string are also included:
Struct _SendBlockV2 {
   DWORD   size;
   DWORD   domainHash;
   DWORD   botBinHash;
   BYTE   serverDomain[size-8];
}
The latest variant has undergone several changes and contains even more data:
struct _PlainTextMessageV3 {
   DWORD         staticDword1;
   DWORD         staticDword2;
   DWORD         staticDword3;
   DWORD         staticDword4;
   DWORD         installFlags;   //bit flags
   QWORD         reserved;
   DWORD         staticDword5;
   DWORD         botBinHash;    //hash of the bot binary
   BYTE          serverDomain[0x28];
   SendBlockV1   mutexName;
   SendBlockV1   parentName;    //parent process
   SendBlockV1   botPath;       //current file path
   SendBlockV1   clsid;         //CLSID generated using local system info
   BYTE          garbage[0 to 0x50];
}
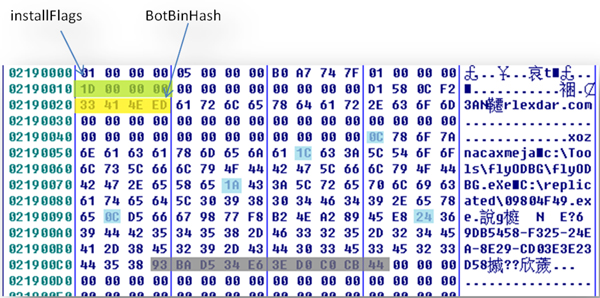
The trend is to include an increasing amount of local environment information so that the server is able to decide how to deal with the bot. For example, in Figure 2, if the server checks the parent process, which is ‘flyODBG.eXe’ (the ‘legitimate’ parent process is svchost.exe), it can easily deduce that the bot sending this message is being debugged.
The message shown in Figure 2 contains a lot of garbage data, some of which is hard coded in the bot binary – such as the first four DWORDs and the eighth DWORD – and some of which is generated randomly, such as the 10 bytes at the end (highlighted in grey). The random garbage data can be any size between 0 and 0x50 bytes. The first meaningful part starts at the 5th DWORD at location +0x10 of this structure: 0x1D, which describes the installation log. It is in bit flags format and has not changed much between the variants. Starting from the lowest to the fifth bit, they are described as shown in Figure 3.
Thus, 0x1D in our example tells the C&C server that the autorun registry entry is set, the mutex ‘xoznacaxmeja’ has been created, the AppManagement and the xoznacaxmejazap registry entries are set, that this system can access urlmon GZIP decompress APIs, and that the CRC32 hash of the current bot executable is calculated. The DWORD 0xED4e4133 at location +0x20 is the hash – this can be used to identify if the executable has been tampered with. It can also be used to check if the current bot needs an update. Starting at +0x24 is the container for the C&C server domain name, the (fixed) size of which is 0x28 bytes. Starting at +0x4C are the strings/value, with the first byte describing the length of each. In order, they are: the mutex name (0xC bytes), the current bot’s parent process (0x1C bytes), the full path of the bot (0x1A bytes), a hard-coded value (0xC bytes) and the CLSID generated using the victim’s system volume information and adapter information (0x24 bytes).
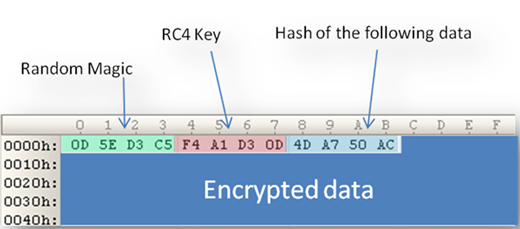
The encryption routine is the thing that differs the most between the variants. In the first and second variants, the encryption uses RC4 and is defined as follows:
struct _MessageToSend V1and2{
   DWORD   magic;
   DWORD   key;
   DWORD   hash;
   BYTE    encryptedMessage[totalContentSize - 0x8];
}
The first DWORD is generated using a random generating algorithm such that the remainder of dividing 0x1ECB will always be 1. The second DWORD is the RC4 key, and the third is the hash value of the message body.
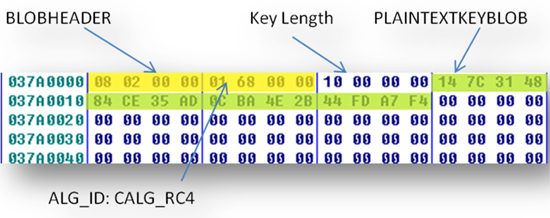
However, it gets complicated in the third variant. The encryption process involves two steps. At first, it makes use of the Microsoft Cryptography functions from the ADVAPI32 library. After calling CryptAcquireContext with pszContainer = ‘Microsoft Enhanced Cryptographic Provider v1.0’ to acquire the new key container, it calls CryptGenKey to generate the RC4 session key. Then it calls CryptExportKey to export the RC4 session key to a PLAINTEXTKEYBLOB struct. The structures are defined as follows:
struct_PLAINTEXTKEYBLOB {
   BLOBHEADER  hdr;
   DWORD       dwKeySize;
   BYTE        rgbKeyData[];
}

struct_BLOBHEADER {
   BYTE       bType;
   BYTE       bVersion;
   WORD       reserverd;
   ALG_ID     algid;
}
Figure 5 shows an example of the exported PLAINTEXTKEYBLOB. The yellow highlighted area is the BLOBHEADER, describing the format and algorithm of the key (0x6801 means CALG_RC4), and the green highlighted area is the RC4 session key.
Next, it calls CryptImportKey to import a 0x94 bytes keyblob that is hard coded in the binary. This is the C&C server’s public key. Again, it calls CryptExportKey to export the RC4 session key, but this time it is exported into the SIMPLEBLOB data structure and using the imported server public key to encrypt the exporting key. The SIMPLEBLOB data structure is defined as follows:
struct _SIMPLEBLOB {
   BLOBHEADER   hdr;
   ALG_ID       algid;
   BYTE         encryptedKey[0x80];
}
Figure 6 shows an example of the exported SIMPLEBLOB. The DWORD 0xA400 (highlighted in orange) describes that this exported key is encrypted using RSA public key encryption. The encrypted session key’s algorithm is CALG_RC4 and highlighted in green.
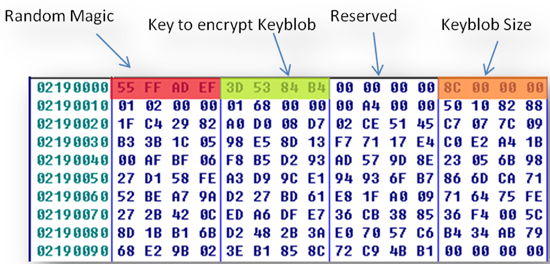
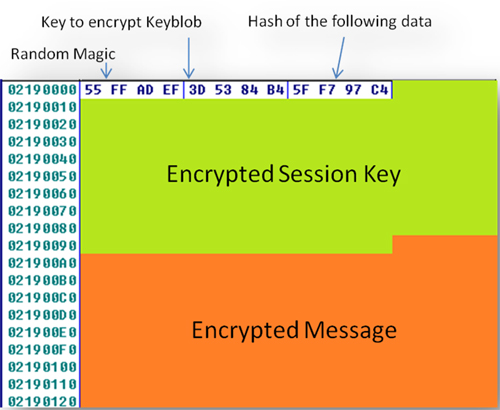
Thus, the RC4 session key has been exported twice, and on the second occasion it is encrypted by the server’s public key so that it can be used for communication. It calls CryptAcquireContext again to create a new key container, imports the plaintext RC4 key and uses it to encrypt the message. In fact, the plaintext key exporting and importing is not necessary since it can just re-use the previously created key handle that is pointing to the session key generated by CryptGenKey. Although the exported key is encrypted using the server’s public key with RSA, it seems the author still wanted to ‘double-tap’ it to make sure the key is secure. It appends four DWORDs to the beginning of the exported SIMPLEBLOB, as shown in Figure 7. They are, in order: magic word, key to encrypt the keyblob, reserved DWORD for hashing the value of the following data, and keyblob size. The magic DWORD value is generated randomly but using an algorithm that means the remainder of dividing 0x1ECB will always be 2.
Next, it encrypts the keyblob with its size using the algorithm described in the following pseudo code, XOR with modified key:
i = 0;
 j = 0;
if ( data &&dataSize&& key )
 {
sKey = 0x19660D * key + 0x3C6EF35F;
totalCount = dataSize / 4;
if ( dataSize / 4 > 0 )
  {
   j = 4 * totalCount;
do
   {
data[ 4 * i] ^= sKey;
sKey = 0x19660D * sKey + 0x3C6EF35F;
     ++i;
    }
while ( i<totalCount );
  }
remain = dataSize % 4;
if ( dataSize % 4 )  //if the data size can’t be divided exactly by 4
  {
temp = 0;
remainStart = (data + 4 * i);
memcopy(&temp, (data + 4 * i), remain);
temp ^= sKey;
memcopy(remainStart, &temp, remain);
   j += remain;
  }
 }
Finally, it appends the encrypted message to the end of the encrypted keyblob and calculates the hash value of the block. The calculated hash value is stored in the reserved place at +0x8 of this structure. The packet it is going to send to the C&C server can be defined as follows:
struct _MessageToSendV3{
  DWORD  magic;
  DWORD  key;
  DWORD  hash;
  DWORD  sessionKeyLenEncrypted;
  BYTE   encryptedSessionKey[sessionKeyLen];
  BYTE   encryptedMessage[totalContentSize-0x10-sessionKeyLen];
}
The response from the C&C server tries to disguise the commands in an HTML page. The commands are surrounded by HTML comment tags and a special tag string that looks like this:
<!--<imgsrc=”data:image/jpeg;base64,[C&C server commands] “/>-->
The server commands are encoded into base64 so they can be transported properly in the HTML page. Then the same decryption routine as used by the older version of Pushdo is called. After base64 decoding, the commands block contains a fake JPEG header, of size 0x14 bytes. After removing the fake header, the data structure is exactly the same as the encrypted sending packet.
In the first and second variants it is the same as struct _MessageToSend V1and2: the magic DWORD, RC4 key, hash value of the message and the message body. After being decrypted using the RC4 key, the plaintext response message structure is defined as:
struct _ReceivedCommandsV1andV2 {
  DWORD  staticDword1;
  DWORD  staticDword2;
  DWORD  staticDword3;
  DWORD  staticDword4;   //they are the same as the sending message
  DWORD  cmdType;
  DWORD  reserved1;
  DWORD  reserved2;
  DWORD  dataSize;
  BYTE   data[dataSize];  //the downloaded file may be compressed
}
The first 0x10 bytes are the same as the sending message. The cmdType is also in bit flags format, and indicates what to do with the data file (which we will explain in detail in the third variant since it doesn’t change much).
In the third variant, the encrypted responding message contains the magic DWORD, key to encrypt the keyblob, hash of the following data, encrypted session key and encrypted message.
The decryption procedure is the reverse of the encryption we described above:
Check the magic word and the hash value.
Use the XOR algorithm to decrypt the DWORD that contains the length of the session key.
Use the same algorithm to decrypt the session key.
Calculate the size of the rest of the data using the total content size minus 0x10 and the size of the session key, and import the session key to decrypt the commands.
The decrypted message structures are described as follows:
struct _ReceivedCommandsV3 {
DWORD cmdCount;
_Command command[cmdCount];
}
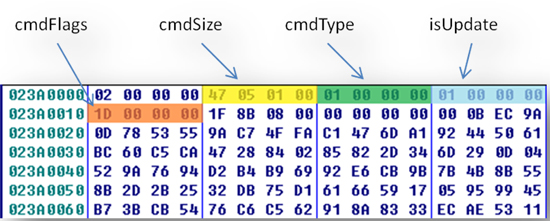
struct _Command {
DWORD cmdSize;
DWORD cmdType;
DWORD isUpdate;
DWORD cmdFlags; //bit flags
BYTE data[cmdSize-0x10]; //the downloaded file may be compressed
}
The ‘cmdType’ can be either 1 or 2. 1 means this data is a download module. If it is 2, this means the following data is an update, then if ‘isUpdate’ is 1, it will write the data to a temporary file and execute it. It will also uninstall the current Pushdo completely, including the registry entries. The ‘cmdFlags’ are defined as shown in Figure 9.
If the ‘Do Injection’ flag is not set, it will create a thread to load the data file into memory then call its entry point. If the ‘Is not active’ flag is set, the command will not be processed. If the ‘Re-extract Clicker’ flag is set, it will re extract the clicker from the current binary, including the domain lists. This is useful when the data file can access and update the current bot’s domain list (located after the tag ‘XNG7’) and the clicker. If the ‘Inject if parent terminated’ flag is set, it will create a thread to monitor the current process. If it is terminated for any reason, the thread will create and inject svchost.exe with the data file. If the ‘Is GZIP-compressed’ flag is set, this means the data file is compressed.
For example, in Figure 10, the cmdFlags = 0x1D (which is 00011101 in binary). It will decompress the data, inject it to svchost.exe, create a monitor thread to monitor the current process, and re-extract/deploy the clicker.
Cutwail is the spam module that Pushdo usually downloads. It can either be injected into a process or spawned as a child thread of Pushdo, depending on the cmdFlags. It creates an autorun registry entry:
HKEY_CURRENT_USER\Software\Microsoft\Windows\CurrentVersion\Run\Regedit32 = %Windows%\system32\regedit.exe
and will drop itself to that location so it can run independently.
All of the configuration except for the spam template is hard coded, and most of the crucial/sensitive strings are encrypted in the binary. When Cutwail first loads the settings, it calls a routine with the index of the setting as the parameter to get the decrypted string value. For example, 0xDA is the index of the C&C server of this spam module, so getValue(0xDA, *p_out) outputs a pointer to string ‘46.4.98.52’ top_out. This routine is also used to decrypt strings such as SMTP commands, library names and system process paths. The decryption algorithm is byte-XOR with a 0x22 bytes string: ‘rwivhuo3xAKDmVJm7NVCSEkT9MpqVypKd’ for the first 0 to 0x1CF4 byes (index 0 to 0xD9) and byte-XOR with another 0x46 bytes string: ‘91GzKGXXQ6kXFHrgKKJkTIuP1AQjbrxs8l0vW2xoXK 43HahzP8JCT4FzVE0cFTm4xYGsQ’ for the rest (index 0xDA to the end). The key strings vary across different variants. Figure 11 shows part of the decrypted string records. The highlighted area is the record at index 0. Each record is 0x22 bytes long for the records from index 0 to 0xD9 and 0x46 bytes long for the records from index 0xDA to the last. After decryption, the string ends with a null byte indicator, ‘00’, and the rest of the 0x22/0x46 records are junk bytes.
The pre-configuration includes addr, port, knockdelay, checksmtpdelay, maxconn, udpsockcount, constconnect, udprecvtimeout, maxudptry, and the configid is set to 1.
It spawns some threads checking connections to legitimate SMTP servers such as mxs.mail.ru and gmail-smtp-in.l.google.com, monitoring max UDP connections, checking DNS responses from root name server querying .com, .org and .de. After spawning a thread checking if there is a spam template available to spam, it connects its C&C server to get commands.
The C&C server is hard coded in the binary. The structure of the message being sent is defined as follows, size 0x1C bytes:
struct _SendData {
  DWORD  currInstallVer;
  DWORD  localIP;
  DWORD  altPort;
  DWORD  configVer;
  DWORD  emaillistID;
  DWORD  localOSVer;
  WORD   settingFlags;
  WORD   respSMTPcount;
}
The currInstallVer is the Cutwail version installed in the current system. It is initially zero and will be updated by the C&C response with cmdType 5, then written to the registry key:
HKEY_CURRENT_USER\SOFTWARE\Microsoft\OSVersion
The localIP is the local machine’s IP, which can be a LAN IP. The altPort is the alternated port this module uses, which is hard-coded to 0x1AC. The configVer is the configuration version. This will be updated if the response from the C&C server contains configuration settings (cmdType = 7). The emaillistID is the email list ID, which will be updated if the response from the C&C server contains a new email list (cmdType = 8). The localOSVer is the return value of the API call: GetVersion. The respSMTPcount is the count of active responses from the legitimate SMTP servers in the check SMTP thread. The settingFlags is defined as shown in Figure 12; only four bits are used.
The ‘Is Preset Loaded’ bit is set if the pre-configuration is loaded successfully. The ‘Restart’ bit is set if the machine is restarted. The ‘ReverseDNSSuc’ bit is set if the local machine’s external IP can be reverse-DNSed to get the domain name – if not, the ‘ReversedDNSFail’ bit is set. These two bits are not set if the C&C server cannot obtain the local machine’s external IP. The receiving data structure is defined as follows:
struct _RecvData {
  DWORD  cmdType;
  BYTE   data[];
}
The responding comdTypes are always in the order: 7, 5, 8, 6 and 1. After receiving the response from the server, it will append or modify the sending message to indicate that. Missing any one of them from the server will result in the bot falling back to send the previous request.
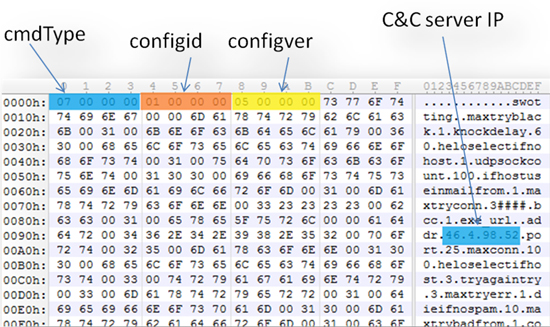
If cmdType is 7, the data contains the new configuration. Figure 13 shows an example of the response.
The new configuration is saved in the memory with the new ‘configver’. This configuration update can also update the C&C server IP and port. Ports 25 (SMTP) and 443 (SSL) are preferred so that the communication blends into other traffic.
If the cmdType is 5, the data[] will be 0x10 bytes long. The first DWORD in data[] is the current installed version, which will update the value under the registry HKEY_CURRENT_USER\SOFTWARE\Microsoft\OSVersion. It will also update the currInstallVer field of the next message sent to the C&C server. The second DWORD is the current machine’s external IP. This is resolved from the C&C server so it is not the LAN IP if the local machine is behind a router. It will run a reverse DNS look up against this IP to get the current machine’s domain name. This affects the lowest two bits of the settingFlags of the next sending message. The domain name is then stored and may be used in spam later. The third DWORD of the data[] is a timestamp of this message; the last DWORD is always 0.
If the cmdType is 8, the data[] contains the list of email addresses which will be used by the spam bot as senders. These email addresses appear to be dummies. The first DWORD of the data[] is probably the id of this list, so that the lists can be stored and indentified in memory. It updates the emaillistID field of the next sending message. The count of the email addresses in each list is a fixed number: 5,022. Each email record starts with a 00 byte and ends with 00 00FF FFFFFF.
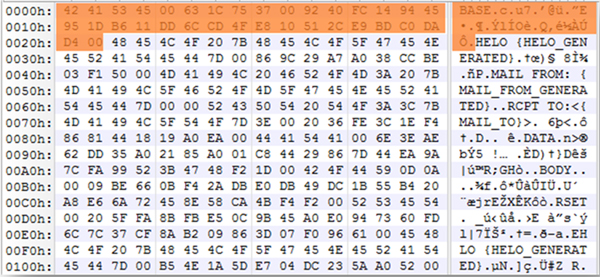
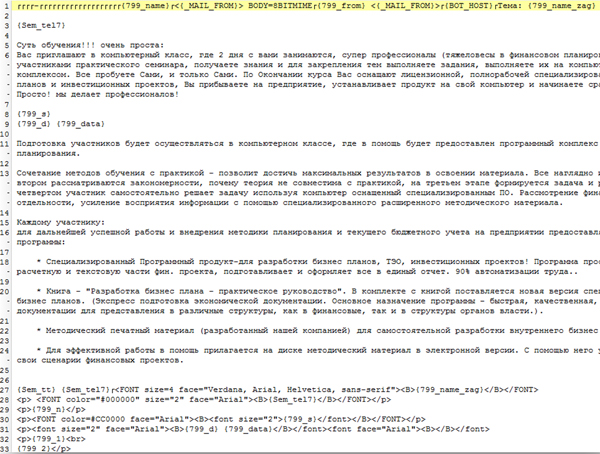
If the cmdType is 6, the data[] contains the vendor ID and the template. The ID is the first DWORD of the data[].
(Click here to view a larger version of Figure 14.)
The example shown in Figure 14 is a template of some kind of scam (probably pyramid selling) in Russian, the email body is in the Koi8-r character set. The template variables are enclosed in brackets. For example, {Sem_tel7} is the topic and a telephone number and {799_d} is the date. The bot appends the vendor ID to the end of the next sending message to indicate that the template has been received.
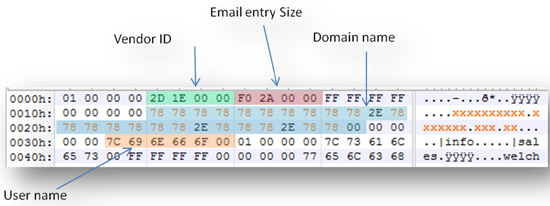
If the cmdType is 1, the data[] contains the email addresses that will be used as spam receivers. The first DWORD of the data[] is the same vendor ID, followed by the size of the email address entries in bytes.
Figure 15 shows an example of the beginning of cmdType 1, the domain name begins with FF FFFFFF 00 000000, and the user name begins with the symbol ‘|’. These email addresses are the victim email accounts. After receiving this command, the bot appends the domains to which the spam emails have been sent, and keeps receiving more victim email addresses.
Both the encryption and decryption of the sending and receiving data use the same algorithm as described by the following pseudo code. When it is sending, it uses the key string ‘turyqioikleraotsorpnehcoote’ backwards and appends a DWORD 0 in front of the encrypted message to make it a total size of 0x20 bytes. When it is receiving, the first DWORD is the total message size.
total = 0;
keyLength = 0x1D;
sKey[keyLength] = “etoochenprostoarelkioiqyrut”;//when receiving it uses “turyqioikleraotsorpnehcoote”
j = 0;
while (dataSize != 0)
{
if (dataSize<= keyLength)
 {
  data[ total] = ~ data[total];//not operation
  total++;
  dataSize--;
 }
else
 {
  j = 0;
  k = total;
  //xor key string backwards
  for (j = 0; j <keyLength; j++)
  {
   temp[j] = sKey[keyLength-1-j]^data[total];
   total ++;
  }
total = k;
  //reverse result
for (j = 1; j <= keyLength; j++)
  {
   data[ total] = temp[keyLength - j];
total ++;
  }
if((k&1) != 0)//total is odd
  {
total = k;
for (j = 0; j <keyLength; j++)
   {
data[total] = ~ data [total];//not operation
total++;
   }
  }
dataSize -= keyLength;
 }
}
During December 2012, Pushdo downloaded only one module other than Cutwail – a DDoS module which had its own self-updating function.