2013-01-08
Abstract
Sebastian Eschweiler describes a static unpacker for the 'XPACK' packer - outlining each step of the unpacking process and looking at how weaknesses in vital steps can efficiently be exploited to produce a generic unpacker.
Copyright © 2013 Virus Bulletin
In contrast to dynamic unpacking of executables, static unpacking requires a thorough understanding of the unpacking algorithm. Commonly, executables are unpacked dynamically, because it is usually the much easier method. Static unpacking, however, has its benefits: it is guaranteed that only trusted code is executed. Furthermore, a static unpacker can be executed with an operating system that is different from the one the original unpacker stub is intended to run on, presenting an additional layer of security.
The official name of the packer we are looking at in this article, as it is advertised in underground forums, is not known. We will refer to it as ‘XPACK’, after the string ‘XPXAXCXK’ which appears within its code.
The first instructions of an XPACKed binary consist of a polymorphic layer that decrypts the actual unpacker stub, amongst other things. Next, the unpacker stub decrypts and decompresses the original binary, and finally it jumps to the original binary’s entry point.
The dynamic unpacking process for XPACK is straightforward and presents a typical example of unpacking executables, as [1] and [2] demonstrate. In summary, dynamically unpacking XPACKed binaries consists of setting breakpoints on memory allocating API functions and functions that change memory access rights (in this example VirtualAlloc and VirtualProtect). Once these API functions are called, a breakpoint is set on the affected memory areas in order to further analyse the code accessing that region. At a certain point, the unpacked original binary is available in memory. Essentially, the unpacking process is finished at this point, and the unpacked binary can be dumped into a file to make it available for static analysis tools.
However, this article deals with the static unpacking of XPACKed files. The actual unpacking code, which is only touched marginally in the dynamic unpacking scenario, is scrutinized in depth.
The article is divided into two parts: in the first part, each step of the unpacking process will be outlined. The second part describes weaknesses in vital steps and how these weaknesses can efficiently be exploited. As a result, a generic unpacker of XPACKed binaries is presented.
The authors of XPACK deploy a series of techniques to thwart generic unpacking of XPACKed binaries. Amongst others, the original binary is compressed, chopped into small pieces and scattered throughout the executable.
The actual unpacker stub is hidden under a polymorphic layer and thus is difficult to spot using AV heuristics. The code of the unpacker stub itself also possesses polymorphic properties in order to hinder further detection and analysis. However, the obfuscation scheme is rather unsophisticated and with almost absolute certainty even contains a severe bug that would lead to undesired results when applied to normal binaries.
The XPACK authors invented a clever method of thwarting simple detection and unpacking. The packed and encrypted content of the original binary is scattered all over the packed executable in small chunks. During the reassembly phase, these chunks are collected and ordered into their original layout.
In the reassembly stage of XPACK, the unpacker stub sifts through the whole binary, byte by byte, and searches for said data chunks. The structure of the chunks is interesting, as the header is not constant. In order to successfully be recognized, the header must conform to a certain set of rules. It comprises eight bytes whose relation to each other must meet the following conditions:
none of the first four bytes must be 0
(byte 0) ^ (byte 1) | (byte 2) must be equal to (byte 4)
(byte 1) ^ (byte 2) | (byte 3) must be equal to (byte 5)
(byte 2) ^ (byte 3) | (byte 0) must be equal to (byte 6)
(byte 0) ^ (byte 3) | (byte 1) must be equal to (byte 7)
Hence, traditional pattern matching cannot find these chunk headers.
Next, a hash function is calculated over the first eight bytes of the polymorphic header. After deobfuscation, it closely resembles classic CRC32 with one important difference that makes it a polymorphic checksum. The key to understanding the polymorphic properties of the checksum lies in understanding the obfuscation scheme. Hence, a short detour introduces some crucial properties of the obfuscation.
One of the obfuscation methods employed by the authors aims to hinder data flow analysis by obfuscating the actual register contents. It can be reduced to the following form:
encrypt(x) = (x + A) ^ B
decrypt(x) = (x ^ B) - A
It is evident that encrypt(decrypt(x)) equals x for any 32-bit integer.
If done properly, the method is well-suited to achieve its goals. However, the authors seem to have missed some basic data-flow principles and added the decryption function of the obfuscation in loops. In particular, during set up of the CRC32 hash table, the code is as follows:
for i = 0 ... 256
  encrypt(i)
  hashTable[i] = genHashTableElement(i)
genHashTableElement(v1):
  for i = 0 ... 8
   if ( decrypt(v1) & 1 )
     v1 = (decrypt(v1) >> 1) ^ 0xEDB88320
   else
     v1 = decrypt(v1) >> 1
  end for
 return v1
Hence, the original data is altered in an erroneous way in the function genHashTableElement, as the decrypt() function is called multiple times during loop execution. Supposedly, the authors employed simple pattern-matching algorithms on the source code for their obfuscation scheme. The correct method would have been to invoke the decrypt() function at the very beginning of the genHashTableElement function.
The result, however, is quite astonishing: by following this apparently erroneous method, the authors have created a polymorphic checksum that is unique to each new obfuscation run.
The other fields of the header contain, amongst others, the size of the chunk and the offset where the chunk was originally placed. Once both the polymorphic header and the CRC32 match, the data chunk is copied to the appropriate location. Thus, the chunks do not have to occur in a particular order.
This procedure of finding valid chunks is repeated throughout the whole binary. Further checking of whether all chunks have been found is not conducted.
Once all chunks have been put in the appropriate place, the next stage in the XPACK unpacking process is a decryption layer. The decryption iterates, byte by byte, over the data, adding a constant and subtracting the loop counter modulo a constant value. The decryption is as follows:
for i = 0 ... len(data)
  s[i] =  s[i] + C - (i % D)
with C and D being constant byte values. Both constants change over different instances of XPACKed binaries.
Once the data has been decrypted, it turns out to be a standard base-64 string. This string is decoded by a standard base-64 decoding algorithm using the common base-64 alphabet.
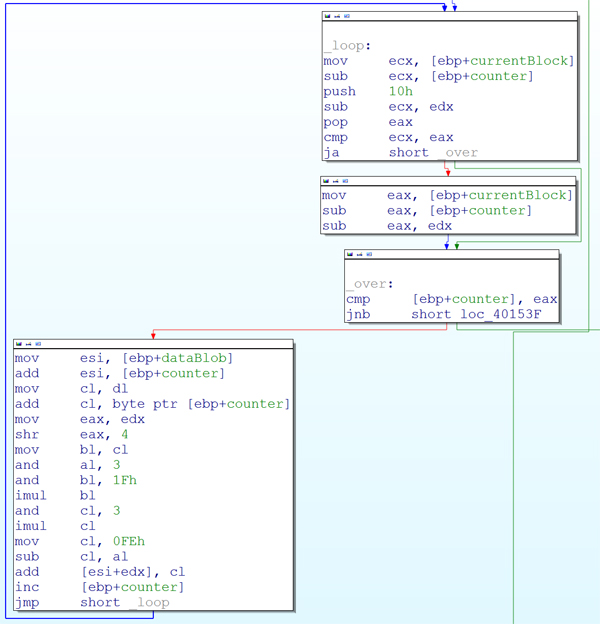
After the base-64 decoding, yet another decryption layer is executed. It is divided into two parts. First, a simple addition/subtraction round is applied on the data blob, as depicted in Figure 1.
The code sequence adds a loop invariant byte-wise to the first 16 bytes of each 64-byte block and subtracts the loop counter from the first eight bytes. As this code sequence neither introduces further polymorphism nor poses any challenges in reverse engineering, it will not be discussed further.
The second part of this decryption layer has some resemblance to the decryption loop of the first layer. Here, the buffer is XORed byte-wise with a constant byte and a constant byte is added/subtracted:
for i = 0 ... len(data)
  s[i] = (s[i] ^ E) - F
with E and F being bytes chosen randomly during packing of the original executable.
As a result of the last decryption layer, a data structure emerges that has a 16-byte header. The first eight bytes of the header are the string ‘XPXAXCXK’. The next four bytes are interpreted as a 32-bit value, depicting the length of the uncompressed data. The last four header bytes denote the length of the compressed data. The rest of the buffer comprises the compressed data.
The decompression algorithm is obviously statically linked into the binary as it does not show the obfuscation methods found throughout the rest of the XPACK code. Furthermore, it seems to be compiled either for minimal size or hand crafted assembly, as some very uncommon patterns can be found, such as calls into the middle of functions etc. Unfortunately, no further information about the decompression algorithm could be found. As the decompression algorithm can be utilized without changes, no further analysis is necessary.
In order to properly and, importantly, generically unpack XPACKed code, all of the challenges its authors created must be overcome. In the following section, weaknesses in each relevant stage of the XPACK implementation will be pointed out. Furthermore, several ways of exploiting these weaknesses will be presented, and the most promising and efficient choices will be discussed.
As the polymorphic hashing function produces different checksums in each XPACKed binary, it is not possible to verify the checksum generically. Remembering the central polymorphic instruction of the hashing algorithm, (x + A) ^ B, the two 32-bit constants, A and B, must be extracted in order to calculate the correct checksum. To do this, the following options come to mind:
Decrypt the unpacker stub and extract the constants: Once the unpacker stub has successfully been decrypted, the modified CRC algorithm can easily be found automatically as the generator polynomial consists of the standard CRC32 polynomial expressed in the 32-bit number 0xEDB88320. In the immediate neighbourhood, the constants in question can be found and extracted.
However, this method requires a thorough understanding of decrypting the unpacker stub and thus adds even more complexity to the static unpacking process. Hence, it should be regarded as a last resort.
Disassemble the XPACKed binary and search for constants: This method relies on the observation that the previously described obfuscation scheme is employed throughout the XPACKed binary, even before the actual unpacker stub is decrypted. Hence, it is feasible to search for possible values of constants A and B in the unaltered XPACKed binary.
This option is preferable over the aforementioned one, as the constants can be derived without having to decrypt the actual unpacker stub.
Skip the validation part of the hash function: As the first part of the header validation already introduces several strong assumptions about the inter-relationship of the first eight bytes, it should hold enough constraints to correctly identify the chunk headers. However, the result of an evaluation over all binaries in a standard Windows installation returns several false positives. For example, if all bytes are the same, the condition ‘(a ^ a) | a == a’ is always true. This anomaly and several others can easily be handled by counting the number of different bytes occurring in the first eight bytes of the header. If it is at most three, then one can safely assume it is an anomaly and disregard the chunk. With this additional constraint, no more false positives appear.
To summarize, the third method requires the least implementation effort. Additionally, it is sufficiently robust to correctly detect XPACK chunks over a large set of binaries.
On the supposition that the polymorphic CRC32 algorithm was implemented by the XPACK authors on purpose, it was a clever trick to complicate reverse engineering. However, the constraints over the first eight bytes are an easily exploitable weakness. Thus, the additional protection by means of a polymorphic hash function has become obsolete. This mistake can be considered to be failure by design.
A thorough understanding of the algorithm employed by the first decryption layer is needed in order to solve it in a generic way. Recapitulating, it is rather easy to grasp:
for i = 0 ... len(data)
  s[i] =  s[i] + C - (i % D)
where C and D are byte values specific to the XPACKed sample.
From the next stage of the algorithm, it is clear that the output of the decryption must only contain characters of the standard base-64 alphabet, thus 64 different characters of the alphabet plus a padding character.
The naïve approach is to brute-force over all combinations of C and D and apply the decryption algorithm until the resulting data only contains characters of the base-64 alphabet. However, there is a much cleverer approach that saves a lot of calculation time.
The algorithm can be divided into two basic operations: addition of a constant to each byte, and addition of a counter modulo a constant value to each byte. By exploiting the knowledge that the outcome of the decryption must be base-64, an algorithm brute-forcing over all 256 possible values of D is able to derive the correct modulus:
iterate modulus m from 2...256
apply s[i] += i % m to each byte of the buffer
count the number of different occurring byte values
stop if the number is at most 65
In step 2, the reverse of -(i % D) is attempted to be applied to the data and thus the modulo-counter is removed if m equals D. In each iteration of the algorithm the data has the form:
s[i] = s[i] + C - (i % D) + (i % m)
If the correct modulus is found, the two addends void each other and only the first addition term remains:
s[i] = s[i] + C
The exit condition in step 4 is valid, as the second operation of the decryption loop is a mere (modulo-)addition of a constant byte value. It can be considered to be a byte-wise ‘rotation’, but it does not change the number of different bytes occurring in the data. Hence, assuming the original data is uniformly distributed and large enough, we can consider that all, or almost all characters of the base 64 alphabet occur at least once. As the modulo-counter operation distributes the values more or less uniformly, all attempts to revert this term will inevitably lead to data that is scattered all over the 256 possible byte values. Thus, there is only one solution satisfying the above condition and it must be the correct one.
As a result of the aforementioned algorithm, D has been successfully recovered and thus this part of the encryption can be removed from the data, resulting in data of the form s[i] + C. As addition over bytes can be considered as addition modulo 256, C can be denoted as a mere offset. To efficiently calculate the correct offset, a ‘binary’ histogram-matching approach is used: in a pre-computation step a histogram over the well-known base-64 alphabet is calculated. Then, the histogram is rotated until it matches that of the intermediate data. As we are only interested in whether a byte occurs in the data or not, it suffices simply to check for existence of the value, not the count, hence the name ‘binary’ histogram. The number of rotation operations is equal to offset C. Again, knowledge of the standard base 64 alphabet has been exploited.
In summary, modulus D is derived by trying to undo the modulo-counter operation over all 256 possible moduli until the number of different bytes in the resulting buffer is at most 65. Offset C can then trivially be found by calculating the binary histograms over the standard base-64 alphabet and over the intermediate data. One of the histograms is rotated until both histograms match.
The presented approach uses at most 256+256 loop iterations, which is orders of magnitude faster than the 256*256 iterations of the naïve approach. This optimization significantly enhances the unpacking speed and makes it feasible for real-time unpacking of incoming malware, even in large-scale applications. Here also, the XPACK authors failed to implement a proper encryption mechanism.
The first stage of the second decryption layer contains no special properties. Hence, the extracted code can be utilized without changes.
As described earlier, the second stage of the decryption layer consists of an XOR and subtraction operation with two constants chosen at the packing process:
for i = 0 ... len(data)
  s[i] = (s[i] ^ E) - F
The naïve approach can also be employed in this case. However, following basic principles of differential cryptanalysis, and using additional knowledge of the succeeding stage, the run-time complexity can be significantly enhanced. The algorithm can be divided into two sub-stages: first, byte-wise XOR of a constant on the data, and second, subtraction of a constant. It is clear that the first eight bytes of the second decryption layer’s outcome must be equal to ‘XPXAXCXK’. Under this assumption, the XORing stage of the algorithm can be tackled by differential cryptanalysis.
It is clear that the second stage (subtracting a constant offset) becomes zero if the difference between two resulting bytes is calculated. Hence, one can apply the XOR operation on the first eight bytes, subtract all pairs of the resulting data and compare it with the subtraction result of the pairs in ‘XPXAXCXK’. This algorithm solves the equation by basic differential cryptanalysis:
iterate n over all 256 possible combinations of E
apply s[i] = (s[i] ^ n) to the first eight bytes of the buffer
assume a valid solution if the differences between all pairs in the resulting data equals the differences between all pairs in the string ‘XPXAXCXK’.
The offset F can trivially be calculated, as all other variables are known. It is important to note that there is more than one possible solution to the equation. Hence, the remaining header fields must be checked for validity. In particular, the unpacked data size is a valuable source to check whether the second decryption layer was successful.
Once more, basic cryptanalysis can be used to retrieve correct values for decryption. The run-time of the approach is 256, as opposed to a complexity of 256*256 in the naïve approach.
During the last stage of the XPACK unpacking process, the resulting data is decompressed. As the algorithm can easily be extracted from the stub, no further steps are necessary in order to get it working properly.
The creators of XPACK put a lot of effort into attempting to thwart generic unpacking of XPACKed binaries – such as spreading the packed contents in chunks all over the binary in a header format that has no fixed constants. Furthermore, they employed (whether intentionally or not) polymorphic checksums, several layers of polymorphic encryption and compression. With each step the authors tried to prevent the possibility of creating a static unpacker. However, each relevant step of the packing process has its own unique flaws that have been exposed and successfully exploited in this article.
Our analysis of XPACK and reverse engineering was carried out using test-driven reversing. The unpacker has been released as open source [3].
[1] Caron, H.; Rascagnères, P. Malware.lu. http://code.google.com/p/malware-lu/wiki/fr_analyse_xpxacxk_dhlreport.
[2] Veliant. http://exelab.ru/faq/XPACK.
[3] Eschweiler, S. https://github.com/eschweiler/XPXAXCXK-Unpacker.